Google Ads conversion tracking: your 2026 setup guide


Set up the Google tag, create conversion actions in Google Ads, enable auto-tagging, and verify everything with Tag Assistant. Do those four things and you will have the data foundation that unlocks Smart Bidding and gives you reliable ROI signals from day one.
Minimum setup checklist (one session):
- Confirm admin access to your Google Ads account and your website
- Enable auto-tagging in Google Ads account settings (Settings > Auto-tagging)
- Create at least one conversion action (Tools > Measurement > Conversions)
- Install the Google tag on every page of your site, or deploy it via Google Tag Manager
- Run a test conversion (test form submit or test purchase) and confirm the tag fires
- Check the conversion status column in Google Ads and verify with Tag Assistant
Why this matters right now: without conversion data, Smart Bidding strategies like Target CPA and Target ROAS have nothing to learn from. Every day your campaigns run without tracking is a day the algorithm optimises blind.
Table of Contents
- What Google Ads conversion tracking is and why it matters
- Which conversion types does Google Ads support?
- Step-by-step: fastest client-side path to set up conversion tracking
- Setting up conversion tracking with Google Tag Manager
- Server-side tagging: when does it make sense?
- Phone-call tracking and importing offline conversions
- Importing conversions from GA4: requirements and checklist
- How to test your setup and fix common problems
- Privacy, consent mode and Canadian considerations
- How conversion definitions affect Smart Bidding and attribution
- Project checklist, timelines and cost estimate
- What a professional conversion tracking implementation looks like
- Key takeaways
- When to do this yourself and when to hire a specialist
- Tech Business Development handles the setup so you can focus on results
- Useful resources and official documentation
What Google Ads conversion tracking is and why it matters
Google Ads conversion tracking is the measurement system that records what happens after someone clicks your ad. A conversion can be a purchase, a form submission, a phone call, an app install, or an offline sale closed by your sales team days later. The system ties those outcomes back to the specific ad, keyword, and campaign that drove them.
That connection is what makes Smart Bidding work. Target CPA and Target ROAS both rely on conversion signals to adjust bids in real time, across millions of auctions per day. Feed them clean, complete data and they perform well. Feed them incomplete or misconfigured data and they will optimise toward the wrong goal, or not optimise at all.
The Google tag is the recommended deployment method because it works across Google products and is built for first-party data collection. Pairing it with Google Analytics 4 (GA4) lets you import GA4 conversion events directly into Google Ads, which means one tagging layer can serve both your analytics and your bidding. That consolidation matters more than ever as third-party cookies continue to disappear from major browsers.
Which conversion types does Google Ads support?
Google Ads supports five main conversion categories. Picking the right ones for your business is the first real decision in any setup.
Website actions cover page loads (a thank-you page after a form submit), button clicks, purchases with transaction values, and any custom event you define. For example, a home services company would track a booking confirmation page as a purchase-equivalent conversion.
App installs and in-app events apply if you run Universal App Campaigns. You can track the install itself or deeper events like first purchase or subscription activation inside the app.
Phone calls split into three methods: calls placed directly from a call-only ad, calls to a forwarding number displayed on your website, and click-to-call taps on mobile. Each method has different setup requirements, covered in detail below.
Imported offline conversions let you upload CRM records back into Google Ads after a lead closes as a real sale. This is the most accurate way to measure ROI for any business with a sales cycle longer than a browser session.
Store visits track physical visits to a business location after an ad click. Availability depends on account history, data volume thresholds, and geography. Canadian advertisers can access store visit reporting where those thresholds are met, though eligibility varies by account.
A few notes specific to Canadian advertisers: Google Forwarding Numbers are available in Canada for website call tracking. AI-qualified call leads and call recording features have specific eligibility requirements and are not universally available in all Canadian account configurations, so verify availability in your account before building a workflow around them.
Step-by-step: fastest client-side path to set up conversion tracking
This sequence assumes you have admin access to Google Ads and can edit your website’s code or tag container.
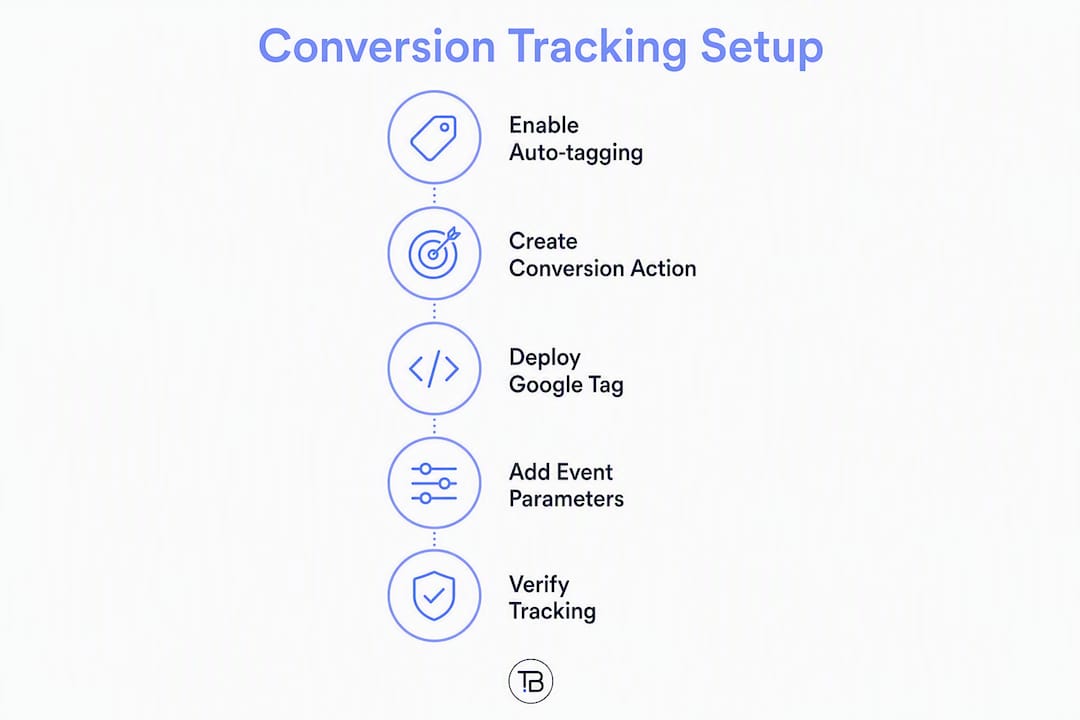
Step 1: Enable auto-tagging
Go to Settings > Account settings > Auto-tagging and confirm the checkbox is on. Auto-tagging appends a GCLID parameter to every destination URL when someone clicks your ad. Without it, Google Ads cannot match a website session to the ad click that caused it, and your conversions will not attribute correctly. Check this before anything else.
Step 2: Create a conversion action
Navigate to Tools > Measurement > Conversions > New conversion action. Choose your category (purchase, lead, page view, etc.), set a conversion value (fixed or dynamic), choose your counting method (every conversion or one per click), and set a conversion window. Mark the action as primary if it will drive Smart Bidding, or secondary if it is informational only. That primary/secondary distinction directly controls which signals the bidding algorithm uses.
For Canadian accounts, set the currency to CAD when entering fixed conversion values. Dynamic values pulled from the page will use whatever currency you pass in the event parameters.
Step 3: Deploy the Google tag
After creating the conversion action, Google gives you the Google tag snippet. Paste it into the <head> of every page on your site. If you use a CMS like WordPress, a plugin like Site Kit by Google or a manual header injection handles this cleanly.

Google Ads supports codeless URL-based conversion events for simple setups: you enter the URL of your thank-you page and Google fires the conversion when that page loads. This works for basic lead forms. For purchases with dynamic transaction values, button-click triggers, or any scenario where the thank-you page URL is accessible without completing the form, you need code-based event snippets or a GTM implementation.
Step 4: Add event parameters for value and transaction ID
For purchase conversions, pass value, currency, and transaction_id in the event snippet. The transaction ID prevents duplicate conversions when a user refreshes the confirmation page. Without it, a single purchase can inflate your conversion count significantly.
Verification
Check the Status column in your Conversions table. A green “Recording conversions” status confirms the tag is firing. Use Tag Assistant to debug in real time. Expect a delay of up to 24 hours before test conversions appear in your reports.
Pro Tip: Enable the Conversion Linker tag (in GTM) or confirm the Google tag is writing first-party cookies on your domain. The Conversion Linker preserves the GCLID across redirects and third-party checkout environments, which is a common attribution gap for e-commerce sites using external payment processors.
Post-launch checklist:
- Confirm at least one test conversion appears in the Conversions column within 24 hours
- Check that conversion value matches what was passed in the event
- Verify no duplicate conversions from page refreshes (use transaction ID)
- Set a calendar reminder to review conversion status weekly for the first month
Setting up conversion tracking with Google Tag Manager
GTM lets you deploy and manage conversion tags without touching your site’s core code after the initial container snippet is installed. Here is how to structure a clean implementation.

Tag templates to use
Use the Google Ads Conversion Tracking tag template for individual conversion actions. If you have not yet deployed the Google tag globally, add a Google tag (gtag.js) configuration tag first and fire it on All Pages. Do not run both a legacy Global Site Tag and a new Google tag simultaneously — that creates duplicates.
Trigger patterns for common conversions
- Thank-you page view: Page URL contains
/thank-youor/order-confirmation— simple and reliable for most lead forms - Button click: Click trigger scoped to a CSS selector (e.g.,
#submit-button) or a click text match — required when there is no dedicated confirmation page - DataLayer event: Custom event trigger listening for
purchaseorgenerate_leadpushed by your site’s code — the most reliable method for e-commerce with dynamic values
Variables to capture
Set up dataLayer variables for transactionId, transactionTotal, and currency. Map these to the Conversion Value and Order ID fields in the Google Ads Conversion Tracking tag. For Canadian stores selling in CAD, hardcode currency: 'CAD' in the tag if your dataLayer does not push it.
Testing workflow
Enable GTM Preview mode before publishing. Click through the conversion flow on your site and confirm the Google Ads Conversion Tracking tag fires on the correct trigger. Then open Tag Assistant in a separate tab and verify the GCLID is present on the landing page URL. If the GCLID is missing, auto-tagging is off or a redirect is stripping it.
Common GTM pitfalls
- Wrong trigger scope: a Click trigger set to “All Clicks” instead of scoped to the submit button fires on every click on the page
- Duplicate tags: both a legacy conversion tag and a new Google Ads tag firing on the same event — check the Tags Fired panel in Preview mode
- Missing dataLayer variables: the tag fires but passes
undefinedfor value — always test with real dataLayer pushes, not just page-load triggers
Pro Tip: Use GTM’s built-in variable debugger to inspect dataLayer values mid-session. If transactionTotal returns undefined, the variable name in GTM does not match what the site is pushing — a one-character typo is the most common cause.
Server-side tagging: when does it make sense?
Server-side tagging moves tag execution from the visitor’s browser to a server you control. Instead of the browser sending data directly to Google, your server receives the event first, then forwards it to Google’s collection endpoints.
The main benefit is data fidelity. Browser-based tags get blocked by ad blockers, privacy extensions, and increasingly aggressive browser privacy settings. A server-side setup bypasses most of those blocks because the request originates from your server, not the visitor’s device. You also gain control over what personal data leaves your infrastructure before it reaches a third party.
Pros:
- Higher conversion capture rate, particularly for audiences with ad blockers
- Control over PII before forwarding to Google
- Better cross-device matching when combined with first-party identifiers
- Reduced page load impact from fewer client-side scripts
Cons:
- Hosting cost (Google Tag Manager server containers run on Google Cloud Run or a similar platform)
- Engineering effort for initial setup and ongoing maintenance
- More complex debugging compared to client-side GTM
Implementation options
The most common path is a GTM server container deployed on Google Cloud Run. You configure a client in the server container to receive events from your web container, then route them to Google Ads and GA4 via server-side tags. Third-party managed server tagging platforms also exist for teams without in-house cloud infrastructure experience.
Pro Tip: For most small Canadian businesses spending under $5,000/month on Google Ads, client-side GTM with a well-configured Conversion Linker will capture the vast majority of conversions. Server-side tagging pays off when your audience skews technically sophisticated (high ad-blocker usage) or when you are passing sensitive data you want to scrub before it hits Google’s servers.
Decision checklist:
- Monthly ad spend and conversion value justify the hosting and development cost
- Your audience has measurably high ad-blocker usage
- You need to strip PII (email, phone) before forwarding events
- You have in-house or contracted engineering capacity to maintain the container
- Cross-device attribution gaps are materially affecting your bidding performance
Phone-call tracking and importing offline conversions
Phone calls and CRM-imported sales are the two conversion types most often skipped by small advertisers, and they are frequently the highest-value ones.
Phone-call tracking methods
Google Ads supports four phone-call tracking methods: calls directly from call-only ads, calls to a Google Forwarding Number displayed on your website, click-to-call taps on mobile, and imported call outcomes from a CRM or call-tracking platform.
The Google Forwarding Number method works by dynamically swapping your business phone number on the website with a Google-provided number for visitors who arrived via an ad click. When they call, Google records the call and attributes it to the campaign.
Steps to set up website call tracking:
- Create a phone call conversion action in Google Ads (category: Phone call lead)
- Set a minimum call duration as a proxy for a meaningful interaction
- Copy the website call conversion snippet and add it to your site alongside the Google tag
- Wait some time after configuration before placing a test call — the forwarding number needs time to propagate, and early tests may still ring your direct business line
- Verify the forwarding number appears on your site for ad-click sessions using a test click from a Google Ads preview link
Pro Tip: Call duration thresholds are a rough proxy. A 90-second call that ends without a booking is not a conversion in any meaningful sense. For service businesses, importing actual booked appointments from your CRM gives you a far cleaner ROI signal than duration-based call tracking alone.
Importing offline conversions from a CRM
Offline conversion import lets you upload closed deals, signed contracts, or qualified appointments from systems like HubSpot or Salesforce back into Google Ads, matched to the original ad click via the GCLID.
Required fields for an offline import file:
- Google Click ID (GCLID)
- Conversion name (must match the conversion action name exactly in Google Ads)
- Conversion time (ISO 8601 format)
- Conversion value (optional but recommended)
- Currency code (CAD for Canadian accounts)
Workflow to preserve the GCLID:
- Capture the GCLID from the landing page URL at the moment of form submission
- Store it as a hidden field in your web form
- Write it to the CRM record when the lead is created
- When the deal closes, export a CSV with the required fields and upload it via Tools > Measurement > Conversions > Upload
Uploads must occur within the conversion window you set (typically 30–90 days). Google recommends uploading within 24–48 hours of the offline event for the most accurate attribution.
Importing conversions from GA4: requirements and checklist
Linking GA4 to Google Ads and importing events as conversions is one of the cleanest ways to maintain a single source of truth for measurement.
Account permissions required:
- Admin access in Google Ads
- Editor access in the GA4 property
- The GA4 property must already be linked to the Google Ads account (Admin > Google Ads Links in GA4)
Eligibility for GA4 events:
Not every GA4 event can be imported. The event must be marked as a key event (formerly “conversion”) in GA4 before it becomes available for import into Google Ads. Events that fire only on the server side without a corresponding GA4 client-side event are not automatically eligible.
Step-by-step checklist:
- In GA4, go to Admin > Events and toggle the event you want to import as a key event
- In Google Ads, go to Tools > Measurement > Conversions > New conversion action > Import > Google Analytics 4 properties
- Select the linked GA4 property and choose the event
- Review the default settings: category, counting method, conversion window, and value
- Save and allow up to 24 hours for the imported conversion to start recording
Common errors and fixes:
| Error | Likely cause | Fix |
|---|---|---|
| GA4 property not listed | Accounts not linked | Complete the Google Ads link in GA4 Admin |
| Event not available to import | Not marked as key event in GA4 | Toggle key event in GA4 Events settings |
| Conversions not recording after import | GA4 event not firing on site | Debug with GA4 DebugView and Tag Assistant |
| Duplicate conversions | Both GA4 import and native tag active | Pause the native Google Ads tag or the GA4 import |
How to test your setup and fix common problems
Testing before you spend real budget is non-negotiable. A misconfigured tag can run for weeks before anyone notices, and by then the bidding algorithm has learned from bad data.
Test checklist:
- Open Tag Assistant and navigate to your site — confirm the Google tag loads on every page
- Enable GTM Preview mode and complete a test conversion flow (submit a real test form or place a $0.01 test order if your platform allows)
- Confirm the conversion tag fires in the GTM Preview panel and that value and transaction ID are populated correctly
- Check the landing page URL for the
gclid=parameter — if it is missing, auto-tagging is off - Wait up to 24 hours and check the Conversions column in Google Ads for the test conversion
- Verify the conversion value matches what you passed in the event
Troubleshooting table:
| Symptom | Likely cause | Fix |
|---|---|---|
| No conversions recorded | Auto-tagging disabled | Enable in Settings > Auto-tagging |
| No conversions recorded | Tag not firing | Debug with Tag Assistant; check trigger scope in GTM |
| Duplicate conversions | Missing transaction ID | Add transaction_id parameter to purchase event |
| Wrong conversion value | Variable not mapped in GTM | Check dataLayer variable name matches GTM variable |
| Conversions attributed to direct/none | GCLID stripped by redirect | Enable Conversion Linker; check redirect chain |
| Status shows “No recent conversions” | Tag installed but no traffic yet | Run a test click from Google Ads Ad Preview tool |
| Offline import not matching | GCLID not stored at lead capture | Add hidden GCLID field to all lead forms |
Time expectations: test conversions typically appear in Google Ads within 24 hours. Imported offline conversions can take up to 72 hours to appear in reports. Smart Bidding needs a minimum volume of conversions over a sustained period before it can optimise effectively — a new conversion action with very low volume will show “Learning” status for several weeks.
On duplicates: the transaction ID field is your primary defence. Pass a unique order or submission ID with every conversion event and Google will deduplicate automatically.
Privacy, consent mode and Canadian considerations
Browser privacy changes and the decline of third-party cookies make first-party data collection via the Google tag the most resilient measurement approach available right now. Consent mode is the mechanism that lets you collect modelled conversion data even when a visitor declines cookies, without recording personal data for those users.
How consent mode works in practice
When a visitor declines tracking consent, consent mode signals to the Google tag that analytics and ad storage are denied. Google then uses aggregated, modelled data to estimate the conversions that would have been recorded, filling gaps in your reporting without using individual-level data from non-consenting users. This modelled data feeds into Smart Bidding alongside observed conversions.
For Canadian advertisers
Canada’s Personal Information Protection and Electronic Documents Act (PIPEDA) and provincial privacy laws (notably Quebec’s Law 25, which has stricter consent requirements) govern how you collect and use personal data from website visitors. The practical implications for conversion tracking:
- Your privacy policy must disclose that you use advertising measurement tools and what data they collect
- Consent banners must offer a genuine choice before analytics or advertising cookies are set
- Quebec’s Law 25 requires explicit opt-in consent for non-essential cookies, which affects how you configure consent mode
Pro Tip: Do not treat consent mode as a technical checkbox. Work with a Canadian privacy lawyer or a qualified privacy consultant to review your consent banner configuration and privacy policy before launching campaigns. The Office of the Privacy Commissioner of Canada publishes guidance on digital advertising and consent at priv.gc.ca.
Operational checklist:
- Privacy notice updated to disclose Google Ads measurement
- Consent management platform (CMP) integrated with Google’s consent mode API
- Consent mode set to “Basic” or “Advanced” depending on your legal requirements
- Data retention settings in GA4 reviewed and set appropriately
- Conversion attribution reviewed after consent mode activation to understand modelled vs. observed split
How conversion definitions affect Smart Bidding and attribution
The settings you choose when creating a conversion action are not administrative details. They directly shape what the bidding algorithm optimises for.
Primary vs. secondary conversions
Smart Bidding only uses primary conversion actions to set bids. Mark a conversion as secondary and it will appear in reports but will not influence automated bidding. A common mistake is marking micro-conversions (page views, video plays) as primary alongside macro-conversions (purchases, leads), which dilutes the bidding signal. Keep primary actions limited to the conversions that represent real business value.
Counting: every conversion vs. one per click
For e-commerce, count every conversion — a customer who buys twice in a session should count twice. For lead generation, count one per click — you do not want a user who submits the same form twice to inflate your lead count and distort your CPA.
Conversion windows
The conversion window defines how far back Google looks to attribute a conversion to a click. Longer windows (up to 90 days) capture more conversions for businesses with long consideration cycles, but they also mean recent campaign changes take longer to show their effect in data. For most lead-gen businesses, a 30-day window balances recency and completeness.
Recommendations by business model:
| Business model | Count method | Suggested window | Value setting |
|---|---|---|---|
| E-commerce | Every conversion | 30 days | Dynamic (pass order value) |
| Lead generation | One per click | 30 days | Fixed (estimated lead value) |
| Appointment-based services | One per click | — | Fixed or CRM-imported |
| SaaS / subscription | Every conversion | 90 days | Dynamic (LTV-based if available) |
Project checklist, timelines and cost estimate
A realistic implementation plan prevents the most common failure mode: rushing deployment without a QA step and discovering the problem three weeks later.
Implementation checklist:
- Audit — inventory existing tags, identify duplicate or legacy conversion tags, confirm auto-tagging status
- Tagging plan — document every conversion action, its trigger, value source, and counting method
- Deploy — install Google tag globally, create conversion actions, configure GTM tags and triggers
- QA — run Tag Assistant, GTM Preview, and test conversions across all conversion types
- Import — link GA4, configure offline import if applicable, test a sample upload
- Reporting validation — confirm conversion data appears in Google Ads, cross-reference with GA4, check for duplicates
Timeline by project scope:
| Scope | Typical duration |
|---|---|
| Small site, basic web conversions | 1–3 days |
| Medium site, multiple conversion types + GA4 import | 1–2 weeks |
| CRM integration + offline import | 2–4 weeks |
| Server-side tagging + CRM + full QA | 4–8+ weeks |
Cost considerations
The Google tag, GTM, and GA4 are free. Paid costs come from developer time (if you cannot deploy tags yourself), GTM server container hosting on Google Cloud Run (billed by request volume), and consultant fees for planning, implementation, and QA. For most small Canadian businesses, a basic client-side setup can be completed by a consultant in a day or two. Server-side projects with CRM integration are multi-week engagements.
Post-launch monitoring (first 90 days):
- Days 1–7: check conversion status daily, confirm no duplicates, verify values
- Days 8–30: review conversion volume trends, confirm Smart Bidding has exited “Learning” status
- Days 31–90: cross-reference Google Ads conversions with CRM records, adjust windows or counting if needed, review automated reporting workflows to catch anomalies early
What a professional conversion tracking implementation looks like
A consultant or agency engagement follows a structured workflow that goes well beyond dropping a tag on a page.
Typical project workflow:
- Audit phase: review existing Google Ads account, GA4 property, GTM container, and CRM setup; identify gaps, duplicates, and legacy tags
- Tagging plan: produce a written tag map documenting every conversion action, trigger logic, variable sources, and data layer requirements
- GTM/container build: configure tags, triggers, and variables in GTM; set up server container if required
- Server-side decision: assess traffic volume, ad-blocker exposure, and PII requirements; recommend client-side or server-side based on actual data
- CRM integration: configure GCLID capture on lead forms, map fields in HubSpot or Salesforce, test a sample offline conversion import end-to-end
- QA and testing: run full Tag Assistant and GTM Preview review across all conversion paths; document results
- Reporting handover: configure Google Ads conversion columns, set up GA4 explorations, and brief the client team on what to monitor
Deliverables a professional engagement typically includes:
- Written tag map and tagging plan document
- Published GTM container with version notes
- Testing report with screenshots from Tag Assistant and GTM Preview
- Offline import template pre-configured for the client’s CRM
- Training session on reading conversion reports and diagnosing common issues
Pro Tip: Ask any consultant you hire to show you the GTM container version history and a Tag Assistant screenshot from a live test conversion. Those two artefacts confirm the work was actually done and tested, not just deployed and assumed to be working.
The outcome of a clean implementation is straightforward: Smart Bidding has accurate signals, your campaign analytics reflect real revenue rather than proxy metrics, and your team spends less time debugging and more time acting on data.
Key takeaways
Accurate Google Ads conversion tracking requires the Google tag, auto-tagging, correctly marked primary conversion actions, and verified deployment before Smart Bidding can optimise toward real business outcomes.
| Point | Details |
|---|---|
| Enable auto-tagging first | Without GCLID appending to URLs, no conversion can be attributed to an ad click. |
| Mark primary conversions carefully | Smart Bidding only uses primary actions; micro-conversions marked primary dilute bidding signals. |
| Use transaction IDs | Passing a unique transaction ID on every purchase event prevents duplicate conversion counts. |
| Import CRM data for full ROI | Offline conversion import from HubSpot or Salesforce gives higher-fidelity ROI than call duration alone. |
| Tech Business Development | Managed GTM, GA4, and CRM integration setup is available for Canadian advertisers who want a verified, done-for-you implementation. |
When to do this yourself and when to hire a specialist
The honest answer is that client-side conversion tracking for a single-product site with one or two conversion actions is genuinely within reach for a marketer who is comfortable in GTM. The setup takes a few hours, Tag Assistant gives you immediate feedback, and the Google documentation is clear. If your site has a thank-you page, you can have a working conversion action today.
The calculus shifts when you add complexity. A multi-step funnel with dynamic purchase values, a CRM integration that requires GCLID capture across form handlers, a server-side container for an audience that uses ad blockers heavily, or a GA4 property with custom events that need careful mapping — any one of those adds meaningful risk to a DIY approach. The cost of getting it wrong is not just a few hours of debugging. It is weeks of Smart Bidding learning from bad data, which means real ad spend wasted.
My threshold: if your monthly Google Ads spend is significant enough that a 10–15% improvement in conversion attribution would materially change your bidding performance, the cost of a specialist engagement pays for itself quickly. If you are running a small test campaign and learning the platform, do it yourself and treat the setup process as education.
For businesses that need server-side tagging, CRM import, or a full audit of an existing messy account, a fixed-scope project with a specialist is almost always faster and more reliable than iterating through it internally. Expect a basic engagement to run a few days of billable time; a full server-side plus CRM build is a multi-week project. Ongoing subscription-based monitoring makes sense once the foundation is solid and you want someone watching for tag breakage after site updates.
Tech Business Development handles the setup so you can focus on results
Getting conversion tracking right the first time is faster and less expensive than fixing a broken implementation after your campaigns have been running on bad data. Tech Business Development sets up and manages the full conversion tracking stack for Canadian advertisers: Google tag deployment, GTM container builds, GA4 linking, offline CRM import configuration, and server-side tagging for accounts where it is warranted.
The typical engagement covers a tag audit, a written tagging plan, GTM implementation, Tag Assistant verification, and a handover session so your team understands what was built and how to read the reports. For businesses that want ongoing coverage, monthly monitoring packages catch tag breakage after site updates before it affects bidding performance. Whether you need a one-time setup or a managed service, the work is scoped, priced clearly, and delivered without a long-term retainer requirement.
See the full scope of available services and request a quote at Tech Business Development’s services page.
Useful resources and official documentation
The resources below are the authoritative starting points for each part of the setup. Read them in the order that matches your immediate goal.
If you are starting from scratch (web conversions):
- Set up your web conversions — Google Ads Help: the canonical setup guide covering the Google tag, codeless URL events, and event snippets
- Auto-tagging — Google Ads Help: explains GCLID, how to enable auto-tagging, and what breaks without it
If you are setting up phone-call tracking:
- About phone call conversion tracking — Google Ads Help: covers all four call tracking methods and their requirements
- Measure calls from ads — Google Ads Help: specific to call-only ads and forwarding number setup, including Canadian eligibility notes
If you are importing offline or CRM conversions:
- Upload conversions from other systems — Google Ads Help: required fields, file format, and upload timing for offline conversion imports
If you want the broader measurement picture:
- Set up your conversions — Google Ads Help: overview of conversion measurement and its role in Smart Bidding
Start with the web conversions guide if your priority is getting a basic setup live today. Move to the offline import documentation once your client-side tags are verified and you are ready to connect CRM data. Server-side tagging documentation lives in the Google Tag Manager Help Centre under “Server-side tagging” and is best approached after you have a working client-side container.
Recommended