Server-side GTM: When to Use It and Why 3 Instances Matter


Server-side GTM runs a container you own in the cloud that receives browser events, cleans and validates them, then forwards that data to Google Analytics, ad platforms, and other vendors. Adopt it when you’re running high traffic, juggling several third-party tags, or facing tightening privacy rules. For a low-traffic site with two or three tags, the added infrastructure usually isn’t worth the trouble.
TL;DR:
- Offloading vendor scripts to a server container reduces page load time by replacing multiple third-party tags with a single, optimized server endpoint.
- Implementing a custom subdomain for the server container enhances cookie durability and privacy compliance, especially under strict browser restrictions.
- Scaling for production requires at least three instances and careful cost management, as cloud hosting can rapidly increase expenses with high traffic and data egress.
- Testing the server container thoroughly in preview mode before launch minimizes costly debugging and configuration errors in live traffic.
- Managed setup services can streamline deployment for teams without cloud infrastructure expertise, reducing operational risk and setup time.
Table of Contents
- What is server-side tagging in Google Tag Manager?
- Benefits and trade-offs of server-side GTM
- GCP automatic provisioning vs manual server hosting
- How to set up a server container in Google Tag Manager
- How to send data to your server container
- Testing your server container before going live
- Production readiness: scaling and cost planning
- Common mistakes when migrating to server-side GTM
- Why managed implementation often beats DIY here
- How Tech Business Development handles server-side GTM projects
- Sources
What is server-side tagging in Google Tag Manager?
Server-side tagging splits your tracking setup into two containers instead of one. The web container still sits in the browser and captures events, but instead of firing a dozen third-party scripts directly, it sends that data to a server container you control, hosted in a cloud environment. That server container becomes an intermediary endpoint owned by your business, which means it can scrub data before any of it reaches a vendor’s servers.
This is the part most explanations skip: the server container isn’t just a pass-through pipe. It’s an active processing layer with its own logic, made up of four components that mirror what you already know from web GTM, just doing different work.
- Clients claim incoming HTTP requests and transform them into structured events. A GA4 client, for instance, recognizes a request shaped like a Google Analytics hit and parses it into something your tags can use.
- Tags take the parsed event and send it onward, whether that’s to Google Analytics, Meta, or a CRM endpoint.
- Triggers decide which tags fire for which events, same logic as the web side.
- Variables pull specific values out of the event payload for use in tags and triggers.
Server containers ship with a Google Analytics client and tag pre-installed, which is why a lot of teams get GA4 events flowing server-side within an hour of provisioning, before they’ve touched a single custom template.
If you need something beyond the built-in options, you can write or install template tags that run inside a sandboxed JavaScript environment. That sandbox matters for security. It restricts what a template can do, so a poorly written or malicious tag can’t reach outside its lane and touch other parts of your server. The two-container model, and the scrubbing it enables, is well documented in Google’s own comparison of client-side and server-side tagging.
Benefits and trade-offs of server-side GTM
The pitch is straightforward: fewer scripts running in the browser, tighter control over what leaves your domain, and cleaner data reaching your analytics platforms. Whether that pitch holds up depends on how you implement it.
Performance improves when you offload resource-heavy vendor scripts from the browser to the server. A page that previously loaded six or seven third-party tags now loads one, your own server endpoint, while the heavy lifting happens elsewhere. That’s a real reduction in client-side JavaScript execution, not a marketing claim.
Privacy and PII control get meaningfully better because the server container sits between the browser and every vendor. You can strip IP addresses, mask query parameters, or drop fields entirely before they leave your infrastructure, something you can’t reliably do once a script fires directly from a user’s browser to a third-party domain.

Data quality improves too, mostly through normalization. Server tags can validate incoming fields, reject malformed events, and standardize formats before anything reaches Google Analytics or an ad platform.
None of this is free. Trade-offs worth weighing before you commit:
- Added architectural complexity: someone now owns a piece of cloud infrastructure, not just a tag configuration.
- Ongoing cloud hosting costs, which scale with traffic.
- Operational responsibility for uptime, scaling, and monitoring shifts onto your team.
Here’s the trade-off in plain terms: the software is free, the responsibility isn’t. Cloud Run configurations that work fine for testing cost roughly $30 to $50 or more per server per month once you upgrade for production traffic, and network usage pushes that higher.
GCP automatic provisioning vs manual server hosting
You have two real paths into server-side tagging: let Google spin up the infrastructure for you, or build it yourself. Both work. They suit different teams.
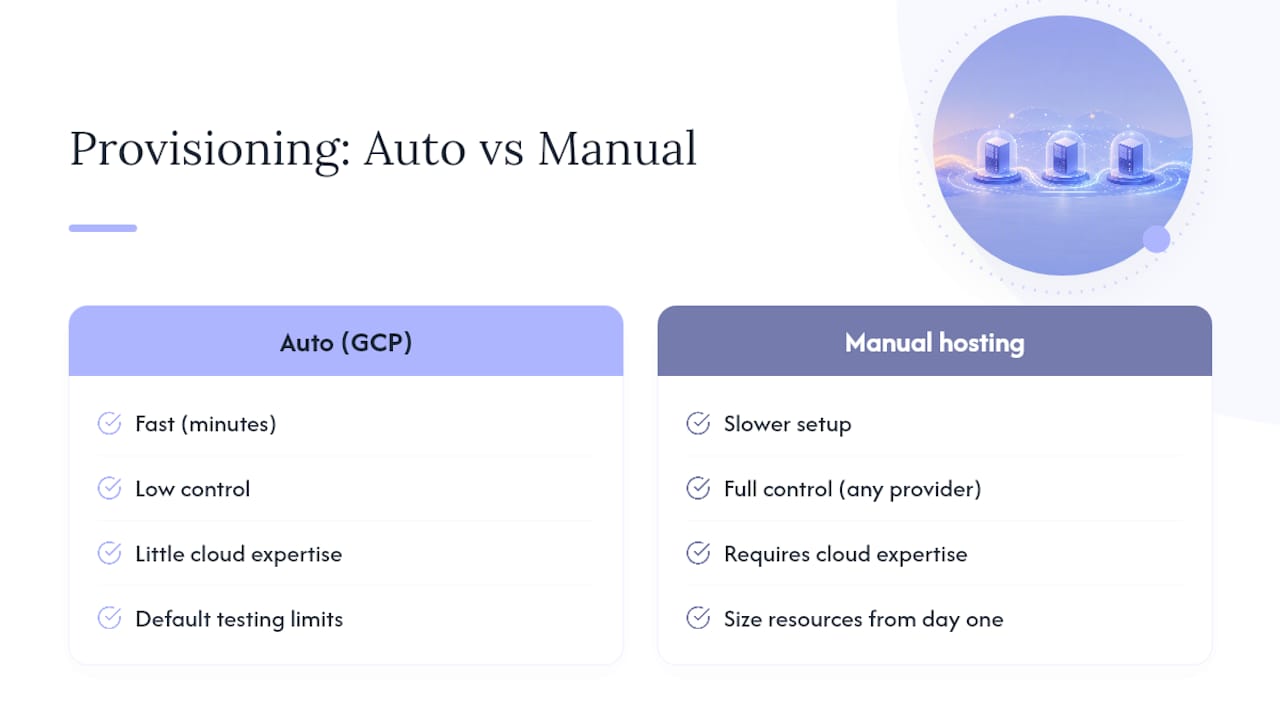
Automatic provisioning through Google Cloud Platform is the fast path. Tag Manager creates a GCP project and deploys a Cloud Run tagging server for you, no manual cloud configuration required. It’s genuinely quick, you can have a working server container in minutes, but the default deployment comes with resource limits designed for testing, not production load. Google is explicit that this setup suits low-traffic validation, not sustained heavy usage.
Manual provisioning gives you more control. You can deploy into an existing GCP project you already manage, use a different cloud provider entirely, or self-host the container on infrastructure your team already runs. This route takes longer to set up and demands more cloud expertise, but it lets you size resources correctly from day one instead of retrofitting a testing deployment into a production workload.
The choice usually comes down to team capacity. If you have a developer comfortable with cloud infrastructure and you know your traffic is significant, manual provisioning saves you a migration step later. If you’re validating the concept first, automatic provisioning gets you there without a cloud engineering project.
Whichever path you take, mapping a custom subdomain to your server container is a step worth taking seriously rather than skipping. Serving your tagging server from something like metrics.yourdomain.com instead of a generic Cloud Run URL changes how browsers treat the cookies your server sets. First-party cookies served from your own domain last longer and survive privacy restrictions like Safari’s Intelligent Tracking Prevention far better than third-party cookies do. Google’s documentation treats this as core setup guidance, not an optional extra, because cookie durability is one of the main reasons teams adopt server-side tagging in the first place. The trade-off is a bit of DNS and TLS configuration work upfront, which is a small price for cookies that actually persist.
How to set up a server container in Google Tag Manager
Getting a server container running involves a specific sequence: create the container, decide how it’s hosted, connect a domain, then harden it before real traffic hits it. Skip a step and you’ll find out during an incident, not during setup.
1. Create the server container in Tag Manager. Inside your Tag Manager account, create a new container and select Server as the target platform (rather than Web, iOS, or Android). This generates a container ID and gives you access to the server-side workspace, distinct from your web container, with its own clients, tags, triggers, and variables.
2. Choose your provisioning method. Tag Manager will prompt you to provision automatically or manually. For automatic provisioning, you’ll authorize access to a Google Cloud account (or create one), and Tag Manager handles the Cloud Run deployment for you. For manual provisioning, you’ll need an existing tagging server URL, either self-hosted or deployed by your infrastructure team, and you’ll point the container at that endpoint instead.
3. Verify the default GA4 client and tag. Once the container is live, check that the pre-installed Google Analytics client and tag are active. This is your fastest way to confirm the pipeline works end to end before you add custom clients.
4. Map a custom subdomain. Configure DNS so a subdomain of your primary site points to the server container, and provision a TLS certificate for it. This step is what turns your server-side setup into genuine first-party infrastructure rather than a third-party endpoint wearing a Google URL.
5. Set instance limits appropriate to your traffic. If you provisioned automatically, revisit the Cloud Run instance settings before launch. Default limits are built for testing. Increase the maximum instance count to handle your expected concurrent traffic, and don’t leave it on default settings once you flip the switch to production.
6. Enable production mode and connect your web container.
Point your web container’s tags at the new server container URL (via server_container_url in gtag.js or the equivalent field in your GTM tag configuration), and confirm events are landing.
7. Monitor before you scale further. Watch request volume, error rates, and response latency for the first few days of real traffic before you consider the deployment stable. Cloud Run’s own metrics dashboard is enough for this early stage; you don’t need custom tooling on day one.
Pro Tip: Don’t provision your production server container the same week you’re testing custom template tags. Keep a separate test container for experimentation so a bad sandboxed script never has a chance to disrupt live tracking.
A useful mental shift here: think in terms of HTTP requests and event streams, not browser triggers. Server-side configuration rewards developers who are comfortable reasoning about request payloads rather than DOM events, and getting a developer involved in this planning stage early avoids a lot of rework later. Teams that plan monitoring and deployment operations for multiple properties often lean on dedicated tooling to keep track of uptime across containers, an approach covered in this operations guide for agencies managing several sites at once.
How to send data to your server container
Once the container exists, you need to actually route events into it. The pattern differs depending on where the event originates.
From the web, using gtag.js. Configure your gtag.js snippet with a server_container_url parameter pointing to your mapped subdomain. Once set, standard gtag('event', ...) calls route through your server container instead of going directly to Google’s collection endpoints. This is the most common entry point and pairs naturally with a broader GA4 setup that already uses gtag.js for measurement.
From mobile apps. Mobile events don’t have gtag.js available, so Google documents two common approaches: a lightweight pixel request that mimics a web hit, or the Measurement Protocol sent through a custom client built to parse mobile-specific parameters. Either approach requires a client in your server container capable of recognizing and structuring that incoming request.
Server-to-server. For backend systems, such as a payment processor confirming a purchase, you replace the vendor’s hostname in your existing integration with your own server container’s domain, then configure a Measurement Protocol client to accept and parse those requests. This is useful for events that never touch a browser at all, like a subscription renewal triggered by a billing system.
Across all three patterns, Google’s guidance is consistent: clients need to know how to parse whatever additional parameters you’re sending, so custom fields require custom client logic, not just a hopeful request body. A safer default, echoed in Google’s own guidance on building server tags, is to lean on automatically collected fields like page location and user agent rather than trusting client-supplied values, and to sanitize anything extra before your tags act on it.
- Web traffic: gtag.js with
server_container_urlset. - Mobile: pixel-style request or Measurement Protocol via a custom client.
- Backend systems: direct Measurement Protocol calls routed to your own domain.
Testing your server container before going live
Preview and debug mode for server containers works differently than the web version, and skipping it before launch is how teams end up debugging in production instead.
- Enter preview mode on your server container from within Tag Manager. This opens a live debugging interface separate from your web container’s preview.
- Generate a test event from your web container, a page view or a custom event configured to route to the server container URL.
- Inspect the incoming HTTP request in the debug panel. You’ll see the raw request your server received, letting you confirm the right parameters actually made it across.
- Check how the client parsed it. The debug view shows the structured event your client built from that raw request, which is where mismatched parameter names or missing fields usually surface.
- Verify trigger conditions fired as expected, and confirm each tag produced the correct output and a successful response status rather than a silent failure.
Google’s debugging documentation frames this as non-negotiable before deployment, and in practice it catches most configuration mistakes before they reach real users. Common errors worth watching for: a client that doesn’t recognize the incoming request format at all (nothing gets parsed), a tag that fires but returns an error status from the destination vendor, and triggers that fail silently because a variable it depends on is empty. All three show up clearly in the debug panel if you know where to look, which is the whole point of testing there before touching your live traffic.
Production readiness: scaling and cost planning
A server container that works in testing can fall over under real traffic if you haven’t planned for redundancy. Google’s own recommendation is blunt: run at least three instances in production, not one, so a single instance failure doesn’t take your entire tracking pipeline down with it.
Beyond redundancy, two variables drive most of your ongoing cost: request volume and network egress. A site sending a few thousand events a day on a default Cloud Run configuration might stay within a low-cost tier. A high-traffic ecommerce property sending hundreds of thousands of events, with payloads that include images or larger JSON bodies, will push both compute and network costs up quickly.
Rough cost bands worth budgeting against:
- Entry-level, low-traffic testing deployments: minimal to low cost on default Cloud Run settings.
- Production deployments with upgraded resources: roughly $30 to $50 or more per server per month, scaling with instance count.
- Heavy-traffic properties with substantial network egress: costs climb further and become harder to predict without monitoring in place.
The software cost is zero. The infrastructure bill is not, and teams that treat server-side GTM as a one-time setup project rather than an ongoing hosting commitment tend to get an unpleasant surprise on their first cloud invoice.
Common mistakes when migrating to server-side GTM
The single most repeated mistake: teams mirror their existing tags server-side without removing the original browser-side versions, then wonder why page speed didn’t improve at all. Google’s own comparison of client-side and server-side tagging is direct about this: duplicating tags without removing the browser copies delivers zero performance benefit, because the browser is still running the exact same scripts it always did, just with a server-side copy running alongside them.
A cleaner migration follows a phased approach: identify which vendor tags are the heaviest on page load, build server-side equivalents, remove the client-side duplicates, and compare load metrics before and after to confirm the gain is real rather than assumed.
Other patterns worth building into your rollout from the start:
- Configure a first-party domain before launch, not after, since retrofitting cookie durability later means asking users to re-consent under a new domain.
- Build consent handling into your server container logic from day one, not as an afterthought once legal flags it.
- Establish event governance early: decide what counts as a valid event, what gets rejected, and who owns that schema, ideally documented alongside your broader analytics governance practices.
- Roll out one vendor tag at a time rather than migrating everything simultaneously, so a bad configuration affects one integration instead of your entire pipeline.
Pro Tip: Keep a rollback plan for your first migrated tag. Leave the old client-side version disabled but not deleted for two weeks, so you can re-enable it in minutes if the server-side version misbehaves under real traffic.
Why managed implementation often beats DIY here
Most of the failure points in server-side GTM aren’t conceptual, they’re operational: someone forgets to upgrade Cloud Run instances before launch, nobody maps the subdomain correctly, or a tag gets duplicated instead of migrated. Server-side projects should start with a full tag inventory, followed by a mapping exercise to decide what moves server-side and what stays client-side, then deployment, and finally a validation pass before anything touches production traffic.
DIY makes sense when you have a developer on staff who’s comfortable with Cloud Run, DNS, and reading HTTP request payloads for a living. Managed implementation makes more sense when your team is strong on marketing and analytics but thin on cloud infrastructure, or when the cost of getting the domain mapping or instance scaling wrong outweighs the cost of paying someone to do it correctly the first time.
— Shayan Shirvani
How Tech Business Development handles server-side GTM projects
If the checklist above sounds like more infrastructure work than your team wants to own, there are service providers who offer full setup of GTM, GA4, and server-side configuration handled internally, so you don’t necessarily need a cloud engineer on payroll to get a tagging server production-ready.

A typical engagement covers tag inventory and mapping, server container provisioning (automatic or manual, whichever fits your traffic), subdomain and TLS configuration for first-party cookies, and a validation pass through preview and debug mode before anything goes live, usually completed within a few weeks depending on how many vendor tags need migrating. It’s the same work outlined in the setup steps above, just executed by a team that does it repeatedly instead of once. If you’d rather have your GA4 and Google Ads conversion tracking routed through a properly hardened server container than spend a month learning Cloud Run yourself, take a look at Tech Business Development’s services and get a scope for your setup.