Set up business email for your small business fast


You need two things to set up business email: a domain you control and an email host to route messages through. That’s it. Most small businesses can go from zero to a working professional address in under an hour.
Here’s the minimum you need to do right now:
- Register or verify ownership of your domain (e.g., yourcompany.com)
- Sign up with an email host (Google Workspace, Microsoft 365, or a standalone provider)
- Add your host’s MX records to your domain’s DNS settings
- Create your first mailbox (e.g., you@yourcompany.com)
- Send a test message to confirm delivery
Security records come next: SPF, DKIM, and DMARC protect your domain from spoofing and keep your mail out of spam folders. You don’t need a website live to do any of this. You only need to own the domain, per ICANN-governed registration.
Pro Tip: Set up SPF and DKIM before you send your first real message. Retroactively fixing deliverability after you’ve already emailed clients is far harder than doing it on day one.
Key takeaways
A working domain-based business email requires a domain you control, an email host, correctly published MX and SPF/DKIM/DMARC records, and MFA enabled on admin accounts before your first send.
| Point | Details |
|---|---|
| Domain ownership is the foundation | You need to own and control the domain before any email host can route mail for you. |
| MX, SPF, DKIM, DMARC are all required | Publishing all four record types protects deliverability and prevents domain spoofing. |
| DNS propagation takes up to 48 hours | Plan for a wait after updating records; most changes resolve within 1 hour in typical cases. |
| Hire help at 10+ users or complex migrations | At that scale, the time cost of DIY setup exceeds the cost of a paid engagement. |
| Tech Business Development covers the full setup | Google Workspace and Microsoft 365 setup, DNS configuration, migration, and documented handoff are all included in the services package. |
Table of Contents
- What do you need before you start the setup?
- Which type of email provider actually fits your business?
- How do you set up business email step by step?
- How do you migrate existing email to your new domain?
- What security and deliverability steps can’t you skip?
- How do you fix the most common setup problems?
- What does business email actually cost?
- When does it make sense to hire someone for this?
- How do you back up and recover business email?
- How do you choose the right domain name for your business email?
- The setup mistake most small businesses make
- Tech Business Development handles this for you
- Useful resources for your setup
- Sources
What do you need before you start the setup?
Gather these before you open a single admin console:
- Domain name and registrar login. You’ll need to edit DNS records. Know which registrar holds your domain (GoDaddy, Namecheap, Google Domains, etc.) and have your login ready.
- Your chosen email host account. Whether that’s Google Workspace, Microsoft 365, or another provider, have the account created or the signup page open.
- A list of mailboxes and usernames. Decide on naming conventions now: firstname@, firstlast@, or role-based addresses like sales@ and support@. Domain-based role aliases such as info@ and billing@ build credibility and let you route mail to the right person without exposing personal addresses.
- A recovery phone number and backup email. Admins get locked out. Have a recovery method that isn’t the mailbox you’re creating.
- Billing method. Most hosted plans charge per user per month. Have a card ready.
Account roles: The person setting this up should be the super-admin initially. Once the domain is verified and mailboxes are live, create a secondary admin account as a backup. Never run a business with a single admin and no fallback.
Keeping your domain registrar separate from your email host gives you flexibility. If you ever switch email providers, you only update DNS records — you don’t have to transfer a domain or negotiate with a bundled provider. It’s a small structural decision that saves real headaches later.
Pro Tip: You do not need a live website to use domain-based email. You only need to own the domain and point its DNS records at an email host.
Which type of email provider actually fits your business?
Four categories cover almost every small business scenario.
Hosted productivity suites (Google Workspace, Microsoft 365) These bundle email, calendar, video calls, and document collaboration into one subscription. Setup is guided, DNS automation is often built in, and SPF/DKIM are handled for you. The trade-off is cost: you pay per user per month, and that adds up as the team grows. For most small businesses, the productivity tools justify the price.
Standalone email hosts Providers focused purely on email tend to cost less per mailbox and give you more control over storage and configuration. They’re a good fit if you already use Google Docs or Microsoft Office separately and don’t want to pay for a second suite. The downside: less hand-holding during setup and fewer integrated tools.
Registrar or web-host bundled email Many registrars and web hosts include email with a hosting plan. The price looks attractive, but these accounts often have limited storage, basic spam filtering, and minimal admin tooling. Migration away from them later can be messy.
Forwarding-only setups A forwarding alias (you@yourcompany.com → yourpersonalgmail.com) costs almost nothing and takes five minutes to configure. It’s fine for a solo founder testing an idea, but you can’t send from your domain address without additional SMTP configuration. Clients who reply will see your personal address in the thread.
Quick recommendations by team size:
- One person: Forwarding alias to start, then upgrade to a hosted suite once you’re billing clients regularly.
- 2–9 people: Google Workspace or Microsoft 365. Both have guided small-business onboarding paths and handle MX, SPF, and DKIM setup with minimal manual DNS work.
- 10+ users: Hosted suites with proper admin tooling, group policies, and archiving. At this scale, the management overhead of a cheap bundled host becomes a real cost.
How do you set up business email step by step?
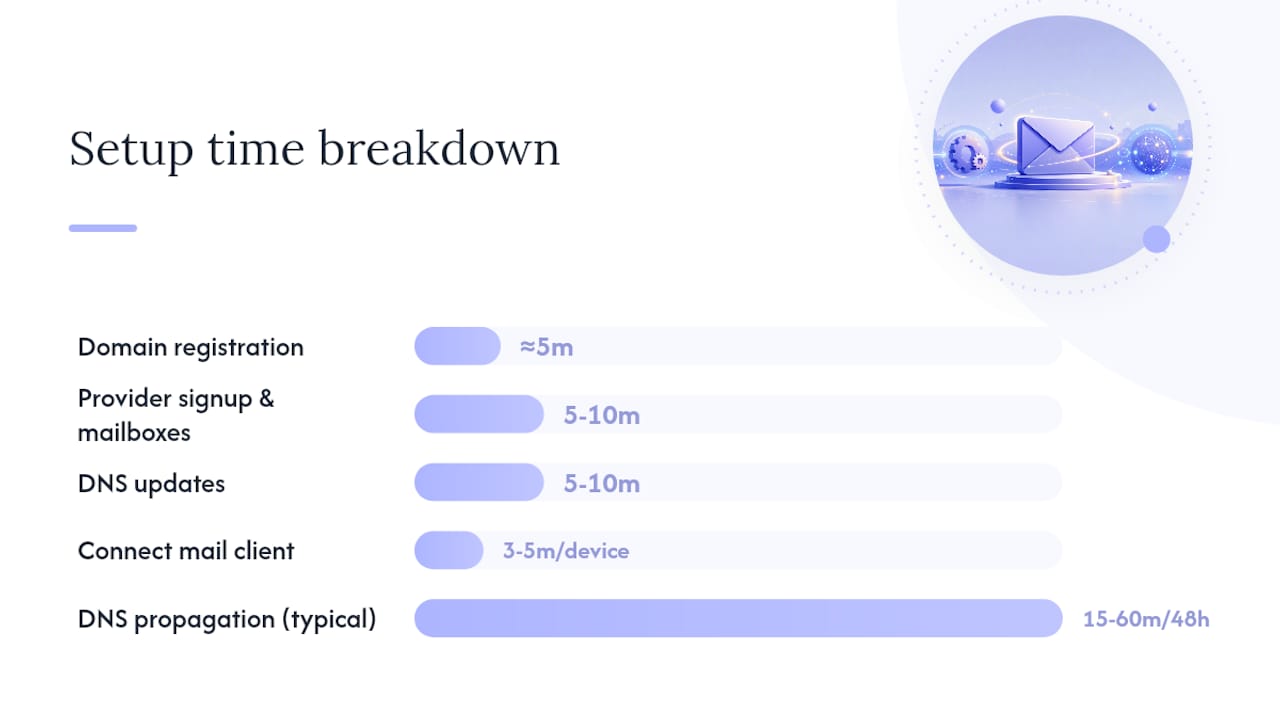
Typical hands-on time breaks down like this: domain registration takes about 5 minutes, provider signup and mailbox creation 5–10 minutes, DNS updates another 5–10 minutes, and connecting a mail client 3–5 minutes per device. DNS propagation is the only wait: usually 15 minutes to 1 hour, though worst-case can stretch to 48 hours.
The setup sequence:
- Sign up with your chosen provider and start the domain verification wizard.
- Add your domain to the provider’s admin console.
- Publish the MX records your provider gives you. Delete any old MX records first.
- Add SPF and DKIM records (your provider generates these).
- Create user mailboxes and any role-based aliases.
- Send a test message from your new address to an external inbox.
- Connect mail clients and mobile devices.
Reference DNS records
| Record type | Host/Name | Value example | Purpose |
|---|---|---|---|
| MX | @ | 10 mail.yourprovider.com |
Routes inbound mail |
| TXT (SPF) | @ | v=spf1 include:_spf.yourprovider.com ~all |
Authorises sending servers |
| CNAME (DKIM) | selector._domainkey |
selector._domainkey.yourprovider.com |
Signs outbound messages |
| TXT (DMARC) | _dmarc |
v=DMARC1; p=none; rua=mailto:dmarc@yourdomain.com |
Sets enforcement policy |
Google Workspace requires you to change your domain’s MX records to route mail to Google’s servers and recommends adding an SPF record to help confirm delivery. Microsoft 365 follows the same pattern: add your domain, publish DNS records, then assign licences to users before they can send and receive.
Pro Tip: Name your admin account something like admin@yourcompany.com rather than your personal name. If you ever hand off IT responsibilities, the admin account stays with the role, not the person.
How do you migrate existing email to your new domain?
If you’re moving from a personal Gmail, an old Outlook account, or a previous host, you have three practical options.
IMAP mailbox copy. Most providers support importing mail from an existing IMAP account. You connect the old account using its IMAP credentials, and the tool copies messages folder by folder. Google Workspace supports importing up to 10 user accounts from Microsoft Exchange Online or IMAP-based services during initial migration.
PST import for Outlook. If your old mail lives in an Outlook PST file, Microsoft 365 lets you import it directly through the admin centre. This preserves folder structure and sent items.
Provider migration tools. Both Google Workspace and Microsoft 365 have built-in migration wizards for common sources. These are the lowest-friction option for small teams.
Migration checklist:
- Export a full backup of the old mailbox before touching anything
- Run a test migration on one mailbox first
- Confirm folder structure, sent items, and calendar events transferred correctly
- Update MX records only after the test passes
- Verify delivery on the new address before decommissioning old routing
- Notify contacts of the new address
A few practical caveats: most hosted plans have per-mailbox storage limits, so large archives may need cleanup before import. Calendar sharing links from the old provider will break and need to be re-shared. Shared mailboxes and distribution lists require separate configuration after migration.
What security and deliverability steps can’t you skip?
Three DNS records do the heavy lifting: SPF, DKIM, and DMARC.
SPF (Sender Policy Framework) tells receiving servers which IP addresses are allowed to send mail for your domain. DKIM (DomainKeys Identified Mail) adds a cryptographic signature to outbound messages so recipients can verify they weren’t tampered with. DMARC ties the two together and tells receiving servers what to do when a message fails both checks.
| Record | Example value | What it does |
|---|---|---|
| SPF TXT | v=spf1 include:_spf.google.com ~all |
Lists authorised sending servers |
| DMARC TXT | v=DMARC1; p=none; rua=mailto:dmarc@yourdomain.com |
Sets policy and requests reports |
Beyond DNS records, enable multi-factor authentication (MFA) for every admin account before you do anything else. A compromised admin account can redirect all your mail in minutes. Set a password policy requiring at least 12 characters or a passphrase, and enforce it at the provider level rather than relying on users to comply.
To confirm your records are working, send a message to an external address and view the raw headers. Look for spf=pass, dkim=pass, and dmarc=pass. If any of those show fail or none, the corresponding record is missing or misconfigured.
Pro Tip: Start DMARC with p=none and a rua reporting address. You’ll receive aggregate reports showing which servers are sending mail on your behalf. Once the reports look clean, move to p=quarantine, then p=reject. Jumping straight to p=reject without monitoring first can silently block legitimate mail.
How do you fix the most common setup problems?
Mail not arriving Check your MX records first. Use a DNS lookup tool (MXToolbox is a widely used free option) and confirm the records match exactly what your provider specified. Old MX records pointing to a previous host are the most common culprit.
Mail landing in spam This almost always means SPF, DKIM, or DMARC is missing or misconfigured. Check each record with a DNS lookup, then send a test message and inspect the headers. Also verify your sending IP doesn’t appear on a public blocklist.
DNS propagation delays If your records look correct but mail isn’t flowing yet, you’re likely waiting on propagation. Most changes resolve within an hour, but propagation can take up to 48 hours in worst-case scenarios. Lowering your DNS TTL (time-to-live) to 300 seconds before making changes speeds this up considerably.
Authentication failures in mail clients Outlook auto-detects many provider settings, but manual setup uses IMAP port 993 with SSL for incoming mail and SMTP port 587 with STARTTLS for outgoing. Wrong ports or a missing SSL toggle account for most client-side failures.
Before you contact support, gather:
- Your domain name and registrar
- Screenshots of your current MX, SPF, and DKIM records
- The exact error message from the mail client or bounce notification
- The time the problem started and what changed just before it
What does business email actually cost?
Pricing follows a few consistent shapes across the market.
Per-user per-month (hosted suites): Google Workspace Business Starter and Microsoft 365 Business Basic both sit in the roughly $6–$7 per user per month range for entry-level plans, with higher tiers adding more storage, video conferencing capacity, and compliance tools. These are publicly listed prices and worth confirming directly with each provider, as they change periodically.
Per-mailbox (standalone email hosts): Email-only providers typically cost less per mailbox than full suites, often under $5 per mailbox per month. You trade the bundled productivity tools for a lower line item.
Free or near-free (forwarding and aliases): Forwarding aliases cost nothing beyond the domain registration fee (typically $10–$20 per year for a .com). They work for testing but not for a professional sending address.
Plan guidance by team size:
- Solo owner: Entry-level hosted suite or a standalone email host. The admin overhead is minimal and the cost is low.
- 2–9 people: A hosted suite pays for itself in shared calendars and document collaboration alone. Google Workspace organises onboarding by team size with specific guidance for this band.
- 10+ users: Budget for higher-tier plans that include email archiving, eDiscovery, and SLA-backed uptime. The cost of a compliance gap at this scale exceeds the price difference between tiers.
Hidden costs to check: migration fees if you’re moving from another host, email archiving add-ons (often sold separately), compliance backup tools, and support response time SLAs. A plan that looks cheap per mailbox can cost more in practice once these are added.
When does it make sense to hire someone for this?
DIY setup works well for a solo founder or a small team with a straightforward domain and no existing mail to migrate. The moment any of the following apply, the time cost of doing it yourself starts to exceed the cost of hiring help:
- More than 10 users to onboard
- Existing mail, contacts, and calendars to migrate without losing anything
- Regulatory or archival requirements (legal holds, HIPAA-adjacent data handling)
- A single admin with no backup and no internal IT support
- No one on the team comfortable editing DNS records
Vetting checklist for a setup provider:
- Do they offer a migration guarantee with a rollback plan?
- Can they configure SPF, DKIM, and DMARC as part of the engagement?
- What’s their SLA for mailbox recovery if something goes wrong post-setup?
- Do they provide documented handoff notes so you’re not dependent on them for every future change?
- Do they handle backup and archiving configuration, or is that a separate engagement?
Before engaging a provider, prepare: your domain registrar login, a list of all mailboxes and aliases needed, export files from your old accounts, and a list of any third-party tools (CRM, helpdesk, marketing platforms) that send mail through your domain. Having these ready cuts the engagement time significantly. Reducing IT operational overhead through a well-documented setup is one of the clearest returns on a paid engagement.
How do you back up and recover business email?
Hosted suites include some built-in recovery, but the defaults are not a backup strategy. Google Workspace retains deleted messages for 30 days in Trash and allows admins to restore a user’s mailbox within 25 days of account deletion. Microsoft 365 has similar retention windows. Neither of those is a substitute for an independent backup.
For genuine protection, use a third-party email backup tool that takes daily snapshots of all mailboxes and stores them outside the primary provider’s infrastructure. This matters most if an admin accidentally deletes a mailbox, a ransomware event corrupts data, or you need to produce mail records for a legal or compliance request.

At minimum, export a full PST or MBOX backup of critical mailboxes quarterly and store it somewhere other than the same cloud account. For teams with compliance obligations, look at archiving solutions that provide immutable storage and search, which is a different product category from a standard backup.
How do you choose the right domain name for your business email?
Your domain name is the first thing a client reads in your email address, so it carries real weight. A few practical rules:
Keep it short and spell-check-proof. If you have to spell it out on a phone call, it’s too complicated. Avoid hyphens, numbers, and creative spellings that look clever in a logo but cause typos in email addresses.
Use a .com if you can get it. Other extensions (.co, .io, .net) are legitimate, but .com still carries the strongest default trust signal for most U.S. business contacts.
Match your legal or trading name as closely as possible. If your business is “Maple Street Consulting,” aim for maplestreetconsulting.com or maplestconsulting.com rather than something unrelated. Consistency between your domain, your email, and your business name reduces friction in every client interaction.
Check social media handles at the same time. Owning yourcompany.com while someone else has @yourcompany on LinkedIn or Instagram creates brand confusion. Register the domain and the handles together.
Finally, avoid domains that are one character off from a well-known brand. Beyond the obvious trademark risk, your mail will get flagged by spam filters that watch for lookalike domains used in phishing.
The setup mistake most small businesses make
The most common error isn’t a technical one. It’s treating email setup as a one-time task rather than a system with ongoing maintenance.
Most small business owners get the mailbox working, skip DMARC because it feels optional, and never set up a backup. Six months later, a spoofed email goes out under their domain, clients get phished, and the business spends weeks repairing the trust damage. The SPF and DKIM records were there, but without DMARC enforcement, there was nothing stopping a bad actor from sending mail that passed basic checks.
The second most common mistake is over-complicating the initial DNS setup. Trying to configure a custom SMTP relay, a third-party spam filter, and a forwarding alias all at once before the basic MX records are even propagated is a reliable way to spend a full day troubleshooting a problem you created yourself. Get the MX records live, test delivery, then layer in security records one at a time.
My recommended baseline for any small business: own the domain outright, use a hosted suite with guided setup, enable MFA on day one, publish SPF and DKIM before your first send, and start DMARC in p=none monitoring mode. That’s it. Everything else, including archiving, compliance tools, and CRM integration, can come later once the foundation is solid.
Pro Tip: Assign a delegated admin role to a second person and keep a simple change log (a shared doc works fine) of every DNS record you add or modify. When something breaks three months from now, that log is the first place you look.
Tech Business Development handles this for you
Getting a professional email address live is straightforward when the setup is clean from the start. The problems show up later: a DMARC record that was never configured, a migration that left half the sent-items folder behind, or an admin account with no backup access. Those are the situations that cost real time and money to fix.

Tech Business Development sets up Google Workspace and Microsoft 365 for small businesses as part of its core services, including domain verification, MX and DNS configuration, SPF/DKIM/DMARC publishing, mailbox creation, and client connection across desktop and mobile. The setup is documented and handed off so you’re not dependent on anyone for future changes. If you’re migrating from an old account, that’s handled too. For teams that want email, CRM, and marketing systems connected from day one, the full services package covers the whole stack. Reach out to get a quote and have your professional email running by end of week.
Useful resources for your setup
These are the primary official sources you’ll need open during each phase of setup.
The resources below cover the most common setup paths. Open the one that matches your provider before you start editing DNS records.
- Microsoft 365 Business Standard setup: Walks through adding a domain, publishing DNS records, and assigning licences to users.
- Add an email account to Outlook: Auto-detect and manual configuration reference, including IMAP port 993 and SMTP port 587 settings.
- Step-by-step business email setup guide: Practical timeline and DNS propagation guidance for hands-on setup.
Sources
- Set up Microsoft 365 Business Standard with a domain
- How to Set Up Business Email: Step-by-Step Guide (2026)
- Add an email account to Outlook - Microsoft Support
Recommended