Preserve Traffic and Email: SMB Hosting Migration, Staging & Redirects


Yes, you can migrate website hosting with minimal downtime, as long as you keep your old host active until the new one is verified. Back up everything first, build the new site on staging, test every function, and only touch DNS once staging checks out clean. Skipping the staging step is what turns a routine transfer into a weekend of panic.
TL;DR:
- Keep your old hosting active until DNS changes have fully propagated and traffic stabilizes to prevent site downtime.
- Back up all site files, databases, email archives, SSL details, and document current server settings before initiating migration.
- Use the appropriate transfer method—manual, control panel, plugin, or host-assisted—based on your site’s complexity and build.
- Verify the new site on a staging environment, then update DNS with a reduced TTL and confirm proper propagation before switching live.
- Monitor search engine indexing, internal links, and site performance for at least two to four weeks post-migration to catch and fix issues early.
Table of Contents
- What do you need before you migrate website hosting?
- Which migration method actually fits your site?
- Step-by-step checklist for the actual transfer
- How do you test the migrated site before going live?
- How do you change DNS safely during a hosting switch?
- How do you move email and SSL without losing messages?
- What should you check after the migration goes live?
- How long does a hosting migration actually take, and what does it cost?
- When does a migration call for managed help instead of DIY?
- Get help migrating your website hosting the right way
- Where to go for deeper migration guidance
- Sources
What do you need before you migrate website hosting?
Before touching anything, gather every credential and record every setting the current site depends on. Missing even one login turns a two hour job into a three day scramble, usually discovered at the worst possible moment (mid transfer, host on the phone, client asking why the site is down).
Start with access. You need the hosting control panel login, FTP/SFTP credentials, database admin access, the DNS registrar login, and Google Search Console and analytics access. If a developer or previous agency set the site up, confirm you actually own these accounts, not just a shared login someone forgot to hand over.
Then back up the substance of the site itself:
- Full website files, including themes, plugins, uploads, and any custom code
- Complete database export, not just tables you recognize
- Email archives, if mail is hosted with the same provider
- SSL certificate details, including private key if it is not free through Let’s Encrypt
- Cron jobs and scheduled tasks
- Third-party integrations (payment gateways, booking widgets, CRM connections)
Store at least two copies of everything, one local and one somewhere off-server entirely. A verified, redundant backup is the single cheapest insurance against a migration going sideways with no way back.
Finally, document the technical baseline: current PHP version, database engine and version, and every DNS record type in use, including A, AAAA, CNAME, MX, and the TXT records handling SPF and DKIM. If your business runs CRM integrations alongside the website, a CRM data migration plan follows the same inventory logic, just applied to customer data instead of web files.
Which migration method actually fits your site?
The right method depends less on your comfort with the terminal and more on how your site is actually built. Pick wrong and you either waste hours on a manual transfer a plugin would have handled in ten minutes, or you jam a complex custom application into a tool built for simple blogs.
- Manual transfer (FTP/SFTP plus phpMyAdmin): the right call for custom-built sites, mixed-stack applications, or anything with a database structure a plugin won’t recognize. A client like FileZilla is the standard tool here, and it gives you full control over exactly what moves and when.
- Control-panel transfer (cPanel to cPanel, DirectAdmin to DirectAdmin): the fastest option when both the old and new host run the same panel software. Many panels include a built-in transfer tool that packages files, databases, and email accounts in one pass.
- WordPress plugins: tools such as Duplicator package your files and database into a single archive for quick redeployment. They work well for smaller WordPress sites, but watch for file size limits on shared hosting and issues with serialized data in the database, which can break widgets or page builder content if not handled carefully.
- Host-assisted migration: many hosts will do the heavy lifting for you, usually for a fee, in exchange for temporary SSH or control panel access. This is the lowest-effort route for site owners who would rather not touch a command line at all.
If your site mixes a WordPress front end with custom booking or membership code, expect to combine methods rather than rely on just one.
Step-by-step checklist for the actual transfer
This is where the migration either goes smoothly or falls apart, usually because a step got skipped under time pressure. Work through it in order, and don’t shortcut the verification points.
- Create and verify full backups. Download a copy locally and confirm a second copy exists off-server. Open the database export and spot-check that tables are intact before moving on.
- Provision the new hosting account. Match PHP and database versions to what the site currently runs. Create empty databases and database users on the new host, and note the exact credentials, since you’ll need them for the configuration step.
- Transfer the files. Upload via SFTP or FTP using a client such as FileZilla, or use your host’s file manager for smaller sites. For large media libraries, a compressed archive uploaded once is faster than thousands of individual file transfers.
- Import the database. Use phpMyAdmin for smaller databases or the command line for larger ones, since phpMyAdmin often times out on imports over a few hundred megabytes. If the domain or file path changed, run a search-and-replace across the database to update old URLs, being careful with serialized data in WordPress installs.
- Update configuration files. Edit the site’s config file (wp-config.php for WordPress, or the equivalent for other platforms) with the new database name, username, password, and host address.
- Restore cron jobs and integrations. Recreate scheduled tasks on the new host and reconnect payment gateways, booking tools, or CRM webhooks. Test each integration individually rather than assuming it carried over.
- Log every change you made. A simple running document of what you changed, and when, is the fastest way to troubleshoot if something breaks two weeks later.
Pro Tip: Keep the old hosting account active and untouched throughout this entire process. If something goes wrong on the new host, you want a working original to fall back on, not a half-deleted source you can no longer reference.
Compatibility issues surface most often around PHP version mismatches and database engine differences. A site built on an older PHP version can throw fatal errors on a host running the current version, and MySQL versus MariaDB quirks occasionally trip up custom queries. Check your new host’s default software stack against your old one before you transfer, not after.
How do you test the migrated site before going live?
Testing happens on a staging environment, meaning your migrated site sits live on the new server but isn’t yet pointed to by your domain. You reach it either through a temporary subdomain the host provides or by editing your local computer’s hosts file to preview it under your real domain name before anyone else can see it.
Password-protect the staging site with HTTP authentication and add a noindex tag so search engines never crawl or index the unfinished version. A pre-launch staging environment is the point where migration checklists consistently save projects from public embarrassment, because this is where broken links and missing redirects get caught before anyone outside your team sees them.
- Test every form, login flow, and payment process end to end.
- Check that images and media load correctly, and that internal links point where they should.
- Run an automated crawl (tools like Screaming Frog or Sitebulb are built for exactly this) to catch broken links and redirect chains before launch
- Confirm analytics and conversion tracking fire correctly in the new environment, not just that the tags are present
Pro Tip: Don’t just click through the site yourself. Have someone unfamiliar with the project test it, since fresh eyes catch broken checkout flows and confusing navigation that you’ve stopped noticing.
How do you change DNS safely during a hosting switch?
DNS is where most of the anxiety around migration actually lives, and most of it is unnecessary if you handle timing correctly.
Lower your DNS TTL (time to live) days before the cutover, ideally down to 300 seconds or less. This tells DNS resolvers around the internet to check for updates far more frequently, which shrinks the window where some visitors see the old site and others see the new one.
- Nameserver changes delegate your entire DNS setup to the new host and can take longer to fully settle across all resolvers.
- A record updates change only the specific pointer for your domain while keeping DNS management elsewhere, generally settling faster since fewer systems need to catch up.
- After making the change, check propagation across multiple regions using a DNS checker tool rather than trusting what your own browser shows, since your ISP may cache the old record longer than others.
Keep the old hosting account live until traffic and search engine indexation both stabilize on the new server. Cancelling early, before you’re certain the migration held, is how site owners end up locked out of their own recovery option.
How do you move email and SSL without losing messages?
Email failures during migration tend to be invisible until a client says “I emailed you last week and got no response.” Document your current mail settings before touching anything, then either run an IMAP copy between old and new mailboxes or use your provider’s built-in migration tool.
- Plan for a delta sync, a second pass that catches messages arriving during the window between your first copy and the actual cutover
- Update MX records as part of the same DNS change, not a separate event, so mail and web traffic move together
- Confirm SPF, DKIM, and DMARC records match the new sending infrastructure to keep deliverability intact
- Install SSL on the new host before cutover, then force HTTPS site-wide once the domain points there
If you’re setting up mail fresh rather than migrating an existing archive, a guide on setting up business email walks through the MX and authentication records in more detail.
What should you check after the migration goes live?
The migration isn’t finished when the new site loads. It’s finished when Google, your analytics, and your actual visitors all agree the transition happened cleanly.
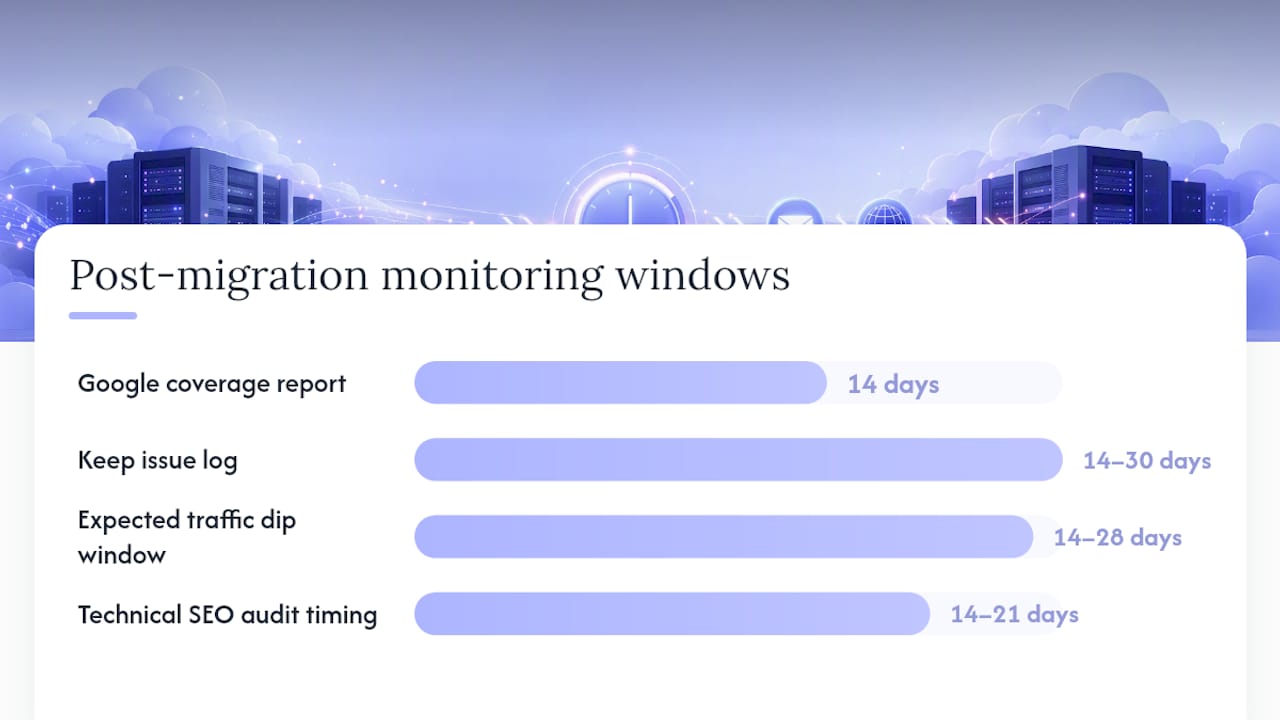
Submit your sitemap in Google Search Console immediately, and keep the old sitemap accessible for a while too so search engines can properly process any URL changes through your redirect mapping. Watch the coverage report daily for the first two weeks.
- Monitor for 404 errors and redirect chains, and patch missing 301s the moment you spot them, since a detailed URL inventory done beforehand is what prevents most of these gaps in the first place
- Update any internal links still pointing to old URL structures rather than relying on redirects to catch every click forever
- Compare traffic, conversions, and Core Web Vitals against your pre-migration numbers
- Keep a running issue log for the first 14 to 30 days rather than trying to remember problems after the fact
A short-term dip of 10 to 15% in traffic for two to four weeks is within normal range for most migrations. A drop beyond that, or one that doesn’t recover after a month, means something in the redirect mapping or indexing process needs attention. Running a technical SEO audit two to three weeks post-launch catches issues a quick glance at analytics tends to miss, and a partner resource on auditing a website for SEO issues covers the deeper technical checks worth running once the dust settles.
How long does a hosting migration actually take, and what does it cost?
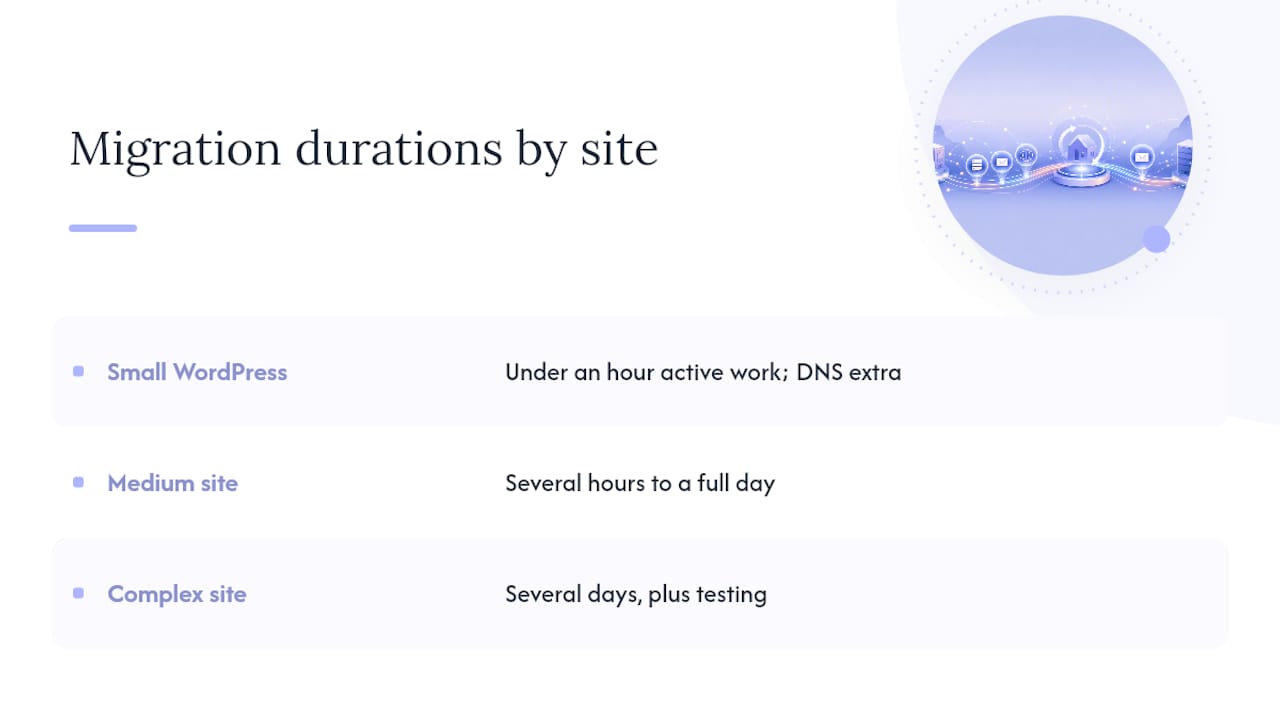
A small WordPress site migrated with a plugin often finishes in under an hour of active work, plus however long DNS propagation takes on top of that. Medium sites with larger media libraries or manual database work usually run several hours to a full day. Complex sites with custom code, heavy integrations, or large databases can stretch across several days once you factor in testing.
Professional or host-assisted migrations charge a fee but cut the risk of something breaking silently. Whichever route you choose, build in a buffer of several days after cutover before cancelling your old hosting account.
When does a migration call for managed help instead of DIY?
Some projects are straightforward enough to handle solo. Others aren’t, and pretending otherwise is how sites end up broken for days. Complex integrations, active e-commerce checkouts, a dozen lead forms, or simply no in-house technical time are the clearest signs a project belongs with a managed service rather than a weekend DIY attempt.
Managed migrations reduce risk precisely because someone is watching the redirect mapping and DNS timing full time, not squeezing it between other work. That difference shows up in shortened time-to-stable production and fewer SEO casualties. Some managed service providers handle migration, hosting setup, and analytics handover as part of their website and Google services work, built for small businesses that would rather not learn DNS propagation the hard way.
Get help migrating your website hosting the right way
If reading through backups, staging environments, and DNS propagation windows sounds like a lot to coordinate alongside actually running your business, that’s exactly the gap Tech Business Development closes. Rather than hiring multiple vendors, some providers offer to handle domain, hosting, website setup, and the surrounding Google services (GA4, Search Console, GTM) as one connected job.

A managed migration service can cover discovery (reviewing your current setup and risks), the actual migration and staging work, full verification against your pre-migration baseline, and a clean handover of your analytics and tracking on the new environment. Before reaching out, have your current hosting credentials, a rough sense of your busiest traffic hours (so cutover happens outside them), and any baseline traffic or conversion numbers you want preserved.
Check out the full range of services Tech Business Development offers, or reach out to book a discovery call and get a straight answer on what your specific migration actually needs.
Where to go for deeper migration guidance
A few resources are worth bookmarking for specific pieces of the process:
- The ultimate site migration SEO checklist for a deeper dive into staging and pre-launch SEO testing
- Semrush’s migration checklist for URL mapping and redirect planning specifics
- Conductor’s migration academy for the phased planning to monitoring framework
- Duplicator for WordPress-specific packaging and transfer
- FileZilla for manual file transfers via FTP/SFTP
Sources