Fix Tracking in 2–4 Hours: GTM Setup for SMBs, Preview First


Create a Tag Manager account and web container, paste the two snippets into your site (one in the head, one after the opening body tag), add a Google tag with your GA4 measurement ID set to fire on all pages, then verify everything in Preview before you publish. That is the entire correct path. A basic site setup usually takes a moderate amount of time; loop in a developer if the snippet placement or data layer work touches a custom-built theme. Google Tag Manager does the rest once it is live, and some consulting firms offer to build this exact sequence for clients who would rather not touch the code themselves.
TL;DR:
- Ensuring correct code snippet placement involves putting the JavaScript snippet in the head and the noscript tag immediately after the opening body tag; improper placement often causes tracking issues.
- Creating one container per domain helps keep permissions clear and trigger logic manageable, especially when managing multiple websites or platforms.
- Testing in Preview mode before publishing is crucial; I confirm tags fire correctly, triggers are scoped properly, and data flows into GA4 accurately, avoiding data loss or duplication.
- Managing permissions carefully by assigning different roles—such as publish, edit, and view—reduces risk and keeps control over who can make or approve changes, especially in larger teams.
- For complex setups such as data layer customization, server-side tagging, or cross-domain tracking, hiring an experienced developer minimizes reporting errors and streamlines ongoing management.
Table of Contents
- Before you begin: accounts, permissions and naming
- How do you create a Tag Manager account and container?
- Where do the two GTM code snippets go?
- Setting up tags, triggers and variables the right way
- Connecting GTM to your GA4 property
- How do you test a GTM setup before publishing?
- Publishing changes and managing versions safely
- Common GTM mistakes and a fast pre-publish checklist
- What is the GTM data layer and how do custom events work?
- How do you manage user permissions in GTM?
- Structuring a complex GTM container without losing control
- Using GTM beyond GA4: Meta, LinkedIn and other platforms
- Keeping a GTM implementation secure
- When does GTM setup need more than a DIY approach?
- Get your GTM setup handled without the trial and error
- Sources
Before you begin: accounts, permissions and naming
Skipping preparation is the single biggest reason GTM setups stall halfway through. Before opening tagmanager.google.com, get three things sorted.
You need a Google account with access to both Tag Manager and Google Analytics, plus your GA4 property already created so you have a measurement ID on hand. Without that ID, you will create tags you cannot finish configuring.
Container scope matters more than most beginners expect. Create one GTM account and a separate container per website in almost every case. A single container serving three different domains creates confusing trigger logic and makes auditing a nightmare six months later. The exception is a mobile app or a server-side setup, where you use a different container type entirely.
Decide upfront who is pasting the code into the site. If a developer is doing it, hand them staging URLs now rather than mid-setup.
- A Google account with tagmanager.google.com and analytics.google.com access
- Your GA4 property created, with the measurement ID location noted
- Confirmation of one container per domain (unless you run a server or app container)
- A developer contact or CMS admin login ready if you are not installing the snippets yourself
- Staging and production URLs, if the site has both
Get these four items confirmed and the rest of the setup moves fast.
How do you create a Tag Manager account and container?
Account and container creation takes under five minutes once you know the sequence, and there are only a handful of decisions that actually matter.
- Go to tagmanager.google.com and sign in with the Google account you confirmed earlier.
- Click Create Account, name it after your business (not the website, if you plan to add more sites later).
- Select your country. This affects nothing functionally, but it should match your business location.
- Enter a container name, typically your domain (example.com).
- Choose Web as the target platform. Save app or server options for mobile apps and server-side setups.
- Click Create, accept the Tag Manager Terms of Service, and Google will generate your two code snippets immediately.
You will be asked whether to share data anonymously with Google to improve its products. Most small and local business setups leave this on, since it has no effect on your own reporting.
If you manage multiple client sites, resist the urge to cram them into one container to “save time.” Separate containers per domain keep permissions clean and prevent one client’s tag from accidentally firing on another’s site.
Where do the two GTM code snippets go?
After container creation, GTM displays two snippets. Copy both before you close that screen, because you will need them in different places.
The first snippet is JavaScript and belongs as high in the <head> tag as your CMS allows, ideally before any other scripts. This is what lets Tag Manager start loading tags before the rest of the page renders. The second snippet is a <noscript> tag that goes immediately after the opening <body> tag, and it exists purely as a fallback for the small number of visitors browsing with JavaScript disabled.
Placement by platform:
- WordPress: paste directly into your theme’s
header.phpnear the top, or use a tag manager plugin if you are not comfortable editing theme files. - Shopify: go to Online Store > Themes > Edit Code, then edit
theme.liquidto add both snippets in their respective spots. - Wix: use the built-in custom code section, or connect through Wix’s own tag manager integration if your plan supports it.
- Custom-built sites: this is a developer job. Hand them the snippets directly rather than describing where they go.
Tag Manager itself does not remove the need to touch your site’s code once. It centralizes everything that comes after this one installation step, which is exactly why getting the placement right the first time matters.
Pro Tip: Ask your developer to confirm the snippet loaded on both staging and production separately. A snippet that works on staging but never made it into the production deploy is one of the most common “why isn’t anything tracking” support tickets.
Setting up tags, triggers and variables the right way
This is where GTM earns its reputation as either brilliantly simple or mildly baffling, depending on how you approach it. The logic is consistent: a tag is the thing that fires (a tracking pixel, an analytics call), a trigger decides when it fires, and a variable supplies the data it needs.
Start with the tag that matters most.
- In your container, go to Tags > New > Tag Configuration > Google tag.
- Enter your GA4 measurement ID (it starts with G, found in GA4 under Admin > Data Streams).
- Set the trigger to Initialization or All Pages so
page_viewfires on every visit without exception. - Save and name it clearly, something like
GA4 - Config - All Pages.
Once that base tag is live, most sites need a handful of event tags on top of it:
- Click tracking on a button or link, using a Click trigger filtered to a specific class or ID.
- Form submit tracking, using GTM’s built-in Form Submission trigger (or a custom event if the form is built with JavaScript).
- Purchase or lead events, triggered on a thank-you page URL or a custom data layer event fired at the moment of conversion.
Each event tag needs the right trigger type, and mismatching them is the most common beginner error. A form submission tracked with a Page View trigger will fire every time someone lands on the confirmation page, including people who refresh it, which quietly inflates your conversion count.
Variables reduce repetitive errors. Rather than typing your GA4 measurement ID into five different tags, store it once in a constant user-defined variable and reference that variable everywhere. If the ID ever changes, you update one place instead of hunting through every tag in the container.
Naming conventions sound like a minor detail until a container has 40 tags in it. A format like Tag Type - Description - Trigger (for example, GA4 Event - Newsletter Signup - Form Submit) means anyone opening the container six months from now can understand what fires and why, without clicking into each one individually. Skipping this step is the single biggest reason GTM containers turn into unmanageable messes as businesses grow.
Connecting GTM to your GA4 property
The measurement ID is the one piece of information the whole GA4 integration hinges on. Find it in GA4 under Admin > Data Streams > select your web stream; it is the string starting with G followed by a dash and a series of digits.
Paste that ID into the Google tag you created in the previous step, and set its trigger to All Pages. That single tag now handles standard page views and, importantly, Google’s current recommended setup uses the Google tag type rather than the older GA4 Configuration tag some tutorials still reference. If you are following an older guide and see instructions for a “GA4 Configuration Tag,” know that the interface and terminology have shifted, though the underlying mechanics are nearly identical.
GA4’s Enhanced Measurement feature, turned on by default in the data stream settings, automatically tracks scrolls, outbound clicks, site search, and video engagement without any GTM configuration at all.
Where GTM earns its place is everything Enhanced Measurement cannot see: custom conversion events, form submissions tied to a specific product, multi-step checkout tracking, or any interaction that depends on your site’s specific structure.
- Use GA4 Enhanced Measurement for scrolls, outbound links, and basic engagement.
- Use GTM event tags for anything tied to your business logic: lead forms, specific button clicks, purchase confirmations.
- Never duplicate the same event in both places. Check GA4’s DebugView before assuming a custom tag is needed.
How do you test a GTM setup before publishing?
Testing is not optional, and it is not something you save for after the site goes live. Preview mode is the primary verification tool, and it should catch problems before GA4 ever sees a single data point.
- In your GTM workspace, click Preview. This opens the Tag Assistant connection window.
- Enter your site’s URL and click Connect. A debug panel opens alongside your live site.
- Navigate the site as a normal visitor would, clicking the buttons and submitting the forms your tags are meant to track.
- In the Debugger panel, check the Tags Fired column for each page load and interaction, confirming your Google tag and event tags appear where expected.
- Click into any fired tag to inspect variable values, particularly your measurement ID and any data layer values tied to an event.
- Cross-check timing under the Summary tab, confirming Initialization and Container Loaded events happen in the expected order.
Only after Preview shows everything firing correctly should you open GA4’s DebugView (Admin > DebugView) to confirm the events actually arrived with the right parameters. Preview shows you the firing sequence in real time; GA4 reporting data, by contrast, can take up to 30 minutes to populate fully, so chasing missing data in standard GA4 reports before checking Preview wastes time on a problem that may not exist.
If Preview will not connect at all, ad blockers and privacy-focused browser extensions are almost always the cause. Testing in an incognito window with extensions disabled resolves the majority of connection failures. If tags connect but the wrong ones fire, recheck the trigger conditions, since a trigger scoped too broadly (or too narrowly) is the next most common issue. Duplicate tags, usually left over from a previous GA4 configuration tag that never got deleted, will show up as two identical page_view events in DebugView.
Before you move to publishing, run through this checklist: page_view fires on every page, event tags fire only on their intended action, no tag appears twice for the same event, and every variable populates with a real value rather than undefined.
Publishing changes and managing versions safely
Publishing in GTM is a two-step action, not one. You Submit your workspace changes, then confirm Publish, and GTM bundles everything into a numbered version you can return to later if something breaks.
Name every version with something specific, not “update” or “changes.” A note like “Added purchase event tag + fixed newsletter form trigger” tells you exactly what changed if you need to diagnose an issue three weeks from now.
- Use separate workspaces if two people are editing the same container simultaneously, so changes do not overwrite each other.
- Run through your pre-publish checklist (Preview passed, no duplicate tags, correct triggers) every single time, not just for major changes.
- Write a version note specific enough that a future reader understands what changed without opening the container.
- If something breaks post-publish, go to Versions, select the last known-good version, and click Publish to roll back instantly.
Rollback is one of GTM’s most underused features. Reverting to a previous version takes seconds and requires no code changes on the site itself, since the container swap happens entirely within Tag Manager.
Common GTM mistakes and a fast pre-publish checklist
Most GTM failures trace back to a small set of repeat offenders, and a prioritized checklist catches nearly all of them before they cost you real data.
- Confirm both snippets are installed: script in the head, noscript after the opening body tag.
- Confirm the Google tag has the correct GA4 measurement ID and fires on All Pages.
- Run Preview and confirm every tag you expect actually fires, with no duplicates.
- Fill in a specific version note before you publish, not a placeholder.
A basic setup for a small business site with a handful of event tags realistically takes two to four hours start to finish, including testing. Enterprise setups with server-side tagging, multiple data streams, and complex e-commerce data layers can stretch into weeks. If your project is heading toward the second category, that is the signal to bring in a developer or a specialist rather than pushing through alone.
| Common problem | Likely cause | Quick fix |
|---|---|---|
| Preview will not connect | Ad blocker or browser extension | Test in incognito with extensions disabled |
| Tag fires on wrong pages | Trigger scoped too broadly | Reassign trigger to the specific page or event |
| Event appears twice in DebugView | Leftover duplicate tag | Delete the old tag, keep the current one |
| Measurement ID typo | Manual entry error | Store ID in one variable, reference it everywhere |
What is the GTM data layer and how do custom events work?
The data layer is a JavaScript object sitting on your page that holds structured information Tag Manager can read, things like a transaction total, a product name, or a form category, that would otherwise be invisible to standard tags.
Think of it as a messenger between your website’s code and GTM. Your developer pushes information into it (dataLayer.push({...})), and GTM’s variables read specific keys back out of it.
A basic custom event push looks like this conceptually: when a purchase completes, the site pushes an event named purchase along with transactionId, transactionTotal, and productName into the data layer. In GTM, you then create a Custom Event trigger listening for purchase, and matching Data Layer Variables for each key you need. Defining that schema clearly and documenting it for your developer before implementation avoids the back-and-forth of guessing what data actually exists on the page.
Without a data layer, GTM is stuck reading whatever is visible in the page’s HTML, which works fine for simple clicks but falls apart for anything transactional. E-commerce tracking, multi-step forms, and subscription events all depend on a properly structured data layer to report accurately.
If your site runs on a major e-commerce platform, some data layer values may already exist automatically. Custom-built sites almost always need a developer to add this manually, which is one more reason to loop them in early rather than after tags are already half-built.
How do you manage user permissions in GTM?
GTM permissions work at two levels: account level and container level, and mixing them up is a common source of “why can’t my client publish” confusion.
Account-level roles control administrative access (creating containers, managing account-wide settings), while container-level permissions control what someone can actually do inside a specific container: view only, edit, approve, or publish.
For most small business setups, a practical structure looks like this: the business owner or their internal marketing lead gets Publish access, a developer or agency gets Edit access without publish rights (so changes go through review first), and anyone who just needs to check tag status gets Read access only.
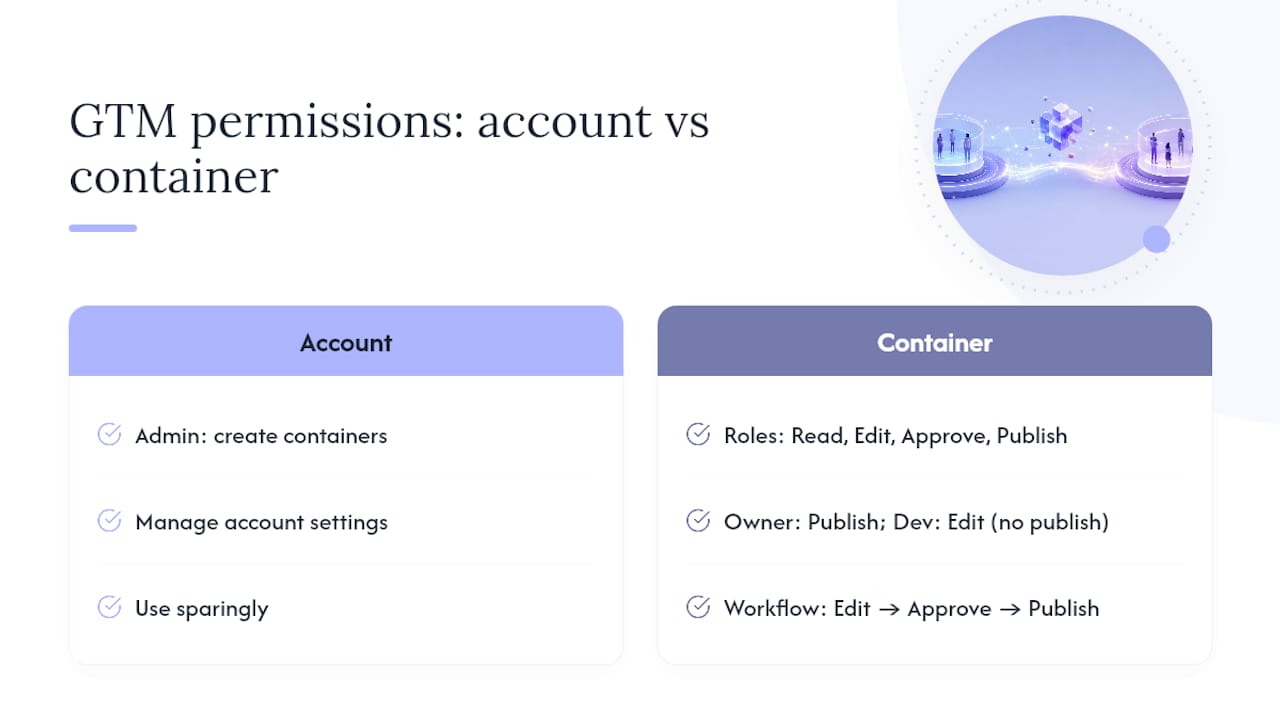
Granting everyone Publish access might feel simpler upfront, but it removes the review step that catches mistakes before they go live. A junior team member with full publish rights can accidentally push an untested workspace straight to production. Locking that down to Edit-only, with a designated approver holding Publish rights, adds a five-minute review step that has saved more than a few businesses from a broken tracking week.
Review permissions periodically, particularly after a contractor or agency relationship ends. Orphaned access is a quiet but common security gap.
Structuring a complex GTM container without losing control
A container with 15 tags is manageable by memory. A container with 80 tags across five departments is not, and structure is the only thing that keeps it from collapsing into chaos.
Folders are the most underused organizational feature in GTM. Grouping tags by function (Analytics, Advertising, Forms, E-commerce) rather than leaving everything in one flat list means a new team member can find what they need without opening every single tag to figure out its purpose.
Consistent naming, covered earlier for individual tags, matters even more at scale. A container where every tag is named GA4 Event, GA4 Event Copy, and GA4 Event 2 is unusable within a month.
Consolidate triggers where possible rather than creating a new one for every tag. If five tags all need to fire on the same button click, they can share a single trigger instead of five near-identical copies that all need updating if the button’s selector ever changes.
For larger sites, workspaces let multiple people work in parallel without overwriting each other’s changes, but only one workspace’s changes get merged at publish time, so establishing a habit of clean, frequent, small publishes beats letting a workspace balloon with six weeks of uncoordinated changes. Regular container audits, checking for unused tags, orphaned triggers, and unclear variable names, keep a growing container from turning into technical debt nobody wants to touch.
Using GTM beyond GA4: Meta, LinkedIn and other platforms
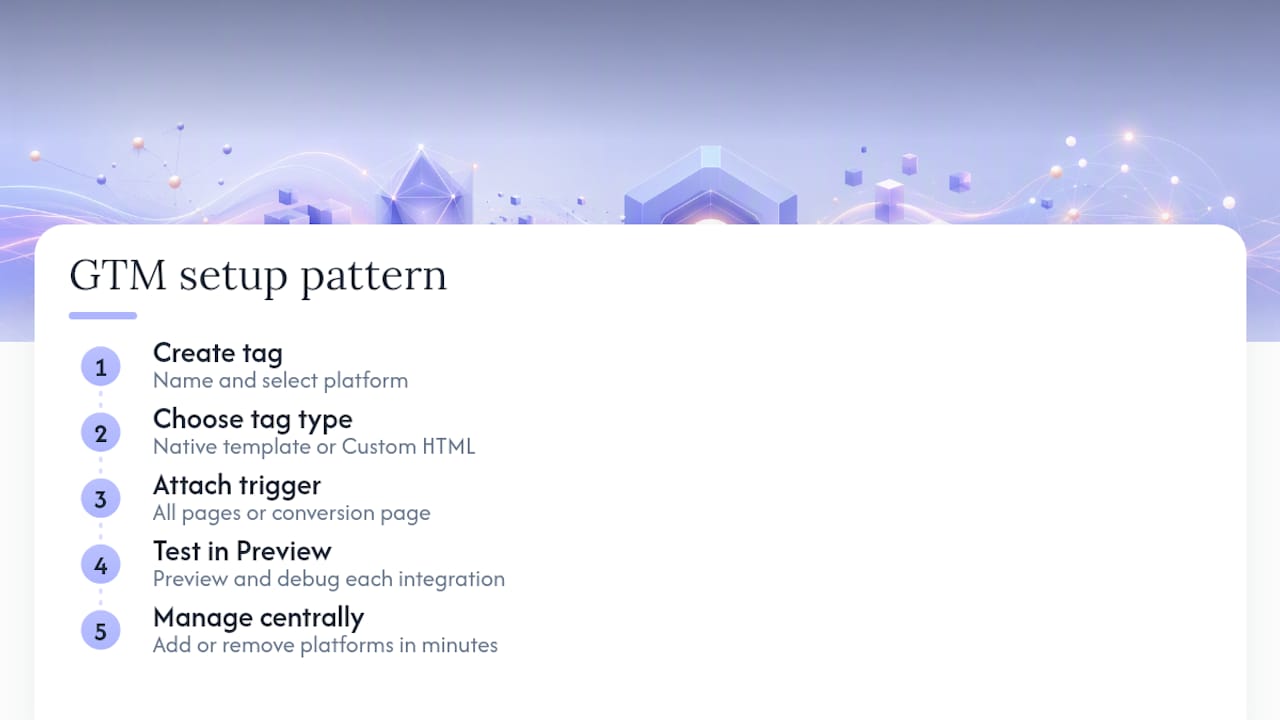
GTM’s real value shows up once you look past GA4. The same container that fires your Google tag can also manage the Meta Pixel, LinkedIn’s Insight Tag, and most other third-party marketing pixels, all without touching your site’s code again after the initial GTM installation.
The pattern is consistent across platforms: create a new tag, choose the appropriate tag type (many major platforms have a native GTM template, others require a Custom HTML tag with the platform’s snippet pasted in), attach the trigger that matches when it should fire, and test in Preview exactly as you would for a GA4 event.
A retargeting pixel for a paid ad platform, for instance, typically needs to fire on all pages for standard tracking, plus a specific conversion event tag on a thank-you or confirmation page. Coordinating these through GTM instead of hard-coding each pixel separately means adding or removing a marketing platform later is a five-minute container change rather than a developer request.
This is also where GTM setup connects directly to paid campaign performance. If your business runs Google Ads, mapping GTM events into Google Ads conversion tracking lets your campaigns optimize toward the actual leads or purchases GTM is already capturing, rather than relying on click data alone.
The caution here is variable overlap. Two platforms both trying to read the same data layer key with slightly different expected formats is a common source of “one pixel works, the other doesn’t” support tickets, so test each new integration in Preview independently before assuming it will behave like the last one.
Keeping a GTM implementation secure
GTM’s flexibility is exactly what makes it a target worth thinking about carefully. Because a Custom HTML tag can run essentially any JavaScript on your site, container access is functionally equivalent to partial code access to your entire website.
That is the core security principle to build around: treat Publish and Edit permissions with the same seriousness as admin access to your website’s backend. Do not hand out full container access to a one-off contractor for a single tag change.
Audit your container periodically for tags you do not recognize. A compromised Google account with container access could add a tracking or data-exfiltration script that looks, at a glance, like any other Custom HTML tag. Reviewing the tag list and confirming every entry has a clear, known purpose is a five-minute habit worth building into your quarterly routine.
Limit Custom HTML tags where a built-in tag template exists instead. Google-maintained templates for common platforms are reviewed and sandboxed more predictably than arbitrary pasted JavaScript, reducing the surface area for something to go wrong.
Finally, keep version history intact and never delete old versions casually. If a security concern ever comes up, having a clean audit trail of exactly what changed, when, and by whom is the fastest way to isolate the problem and roll back with confidence.
When does GTM setup need more than a DIY approach?
Most of what is covered above, a base GA4 tag, a few event tags, standard trigger logic, is genuinely manageable without a developer on staff. Where that changes is data layer work, server-side tagging, and anything touching multi-domain or complex e-commerce tracking.
Custom data layer events for a checkout flow, cross-domain tracking between a marketing site and a separate booking platform, or migrating to server-side GTM for privacy or performance reasons are all places where a wrong configuration quietly breaks reporting for weeks before anyone notices. That is the point where getting outside expertise pays for itself.
Specialized service providers handle this end of the work directly: GTM installation, GA4 integration, data layer specification, and server-side tagging setups for small and local businesses that would rather hand this off than learn it under deadline pressure.
If you are doing this yourself, the best next step is documentation, not more tools. Write down your naming conventions, your data layer schema if you have custom events, and your container structure before handing anything to a developer or agency. A clean handoff document saves hours of back-and-forth, and it is the single habit that separates a GTM setup that stays maintainable from one that turns into a mess within a year.
— Shayan Shirvani
Get your GTM setup handled without the trial and error
Some companies offer a faster route to a working GTM setup than piecing it together from tutorials over a weekend, especially if your site has custom events, e-commerce tracking, or multiple marketing pixels to coordinate; see our Marketing Automation Checklist for a step-by-step guide that complements GTM setup and measurement planning.

The team handles the parts that trip up most beginners: correct snippet installation, a Google tag connected to your GA4 property, a documented data layer specification for your developer, and server-side tagging when a site needs it. Every setup gets tested in Preview before anything goes live, and you receive a written handoff document covering exactly what was configured and why.
Typical engagements run from initial container setup through QA and publish within days, not weeks, and include naming conventions and version notes future edits will depend on. If tracking needs go beyond GA4, such as call tracking for lead-based businesses or advertising pixels across multiple platforms, the same setup can cover it in one pass rather than piecemeal fixes later.
Request a quote from a qualified consulting firm and get your Tag Manager container built, tested, and published correctly the first time.
Sources